Our Bathroom Renovation With Home Depot
Wow, old homes are so much fun to renovate…said no one ever. All jokes aside, we knew that this needed to be done to not only better our family of five sharing one full bathroom with no storage, but also to make our time spent in the home while the world is upside down more enjoyable.
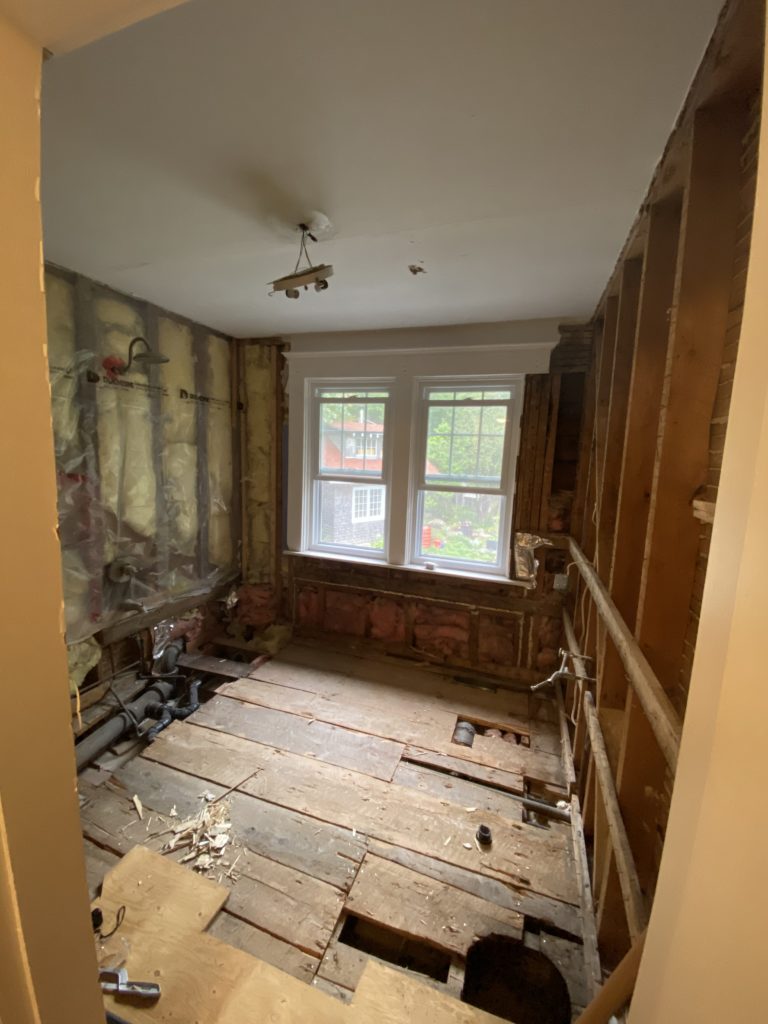
We inherited a mismatched bathroom when we moved in. There was a homemade barnwood vanity, with a sink so far back, the kids could never properly use it (even on a stool). It had just one giant open space inside with a hand sewn curtain covering the mess. Opposite to that, there was the original cast iron tub made in Toronto, Ontario in 1938. It was chipped and stained and sat in an odd space where the window was half in it. It HAD TO GO. Finally, tucked in a small corner (you really needed to squeeze to get back there) was a yucky toilet which didn’t even have the proper floor seal, causing the boards under the tile to be squishy and rotted out.


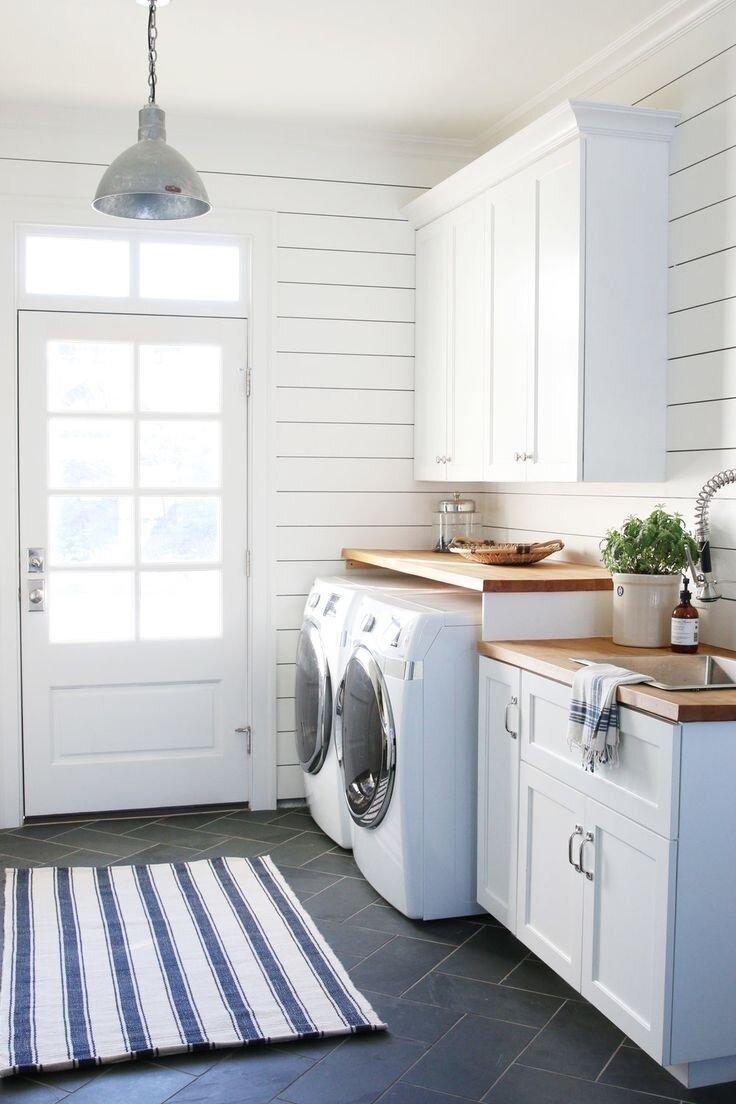
We bought the house knowing the room’s faults, but wanted to prioritize renovating it until certain other large ticket rooms (aka the laundry room) had been done. Now that it was the bathroom’s time to shine, we were on a strict budget. Renovating down to the studs like we had to, we knew would cost a pretty penny. Bringing in contractors to help like we did with the laundry, would cost even more. We knew this was something we had to take on by ourselves.
Now that it’s over, I can attest to the fact that people in the trades are worth their weight in gold. Beside moving the plumbing ($800) and the electrical ($600) we took on the rest. Boy did we learn. I won’t say that we won’t do it by ourselves again, but I also think if the ability to hire out for drywall and tiling is there, I’d opt for budgeting that in.
So what exactly did we do?
Before anything, I created a mood board showcasing the look I wanted. I headed to Homedepot.ca and pulled my want list straight from the site. We love that The Home Depot Canada has great price points to fit any budget and they deliver straight to our door. This is a must when we don’t own a truck and live in the country, an hour away from any The Home Depot Canada locations or similar stores. From the clawfoot tub, to the sconces, they had everything I was looking for in the exact style and colourways, plus it was so easy to place the order. I made sure we had the full order in to allow for time to deliver before we needed it.


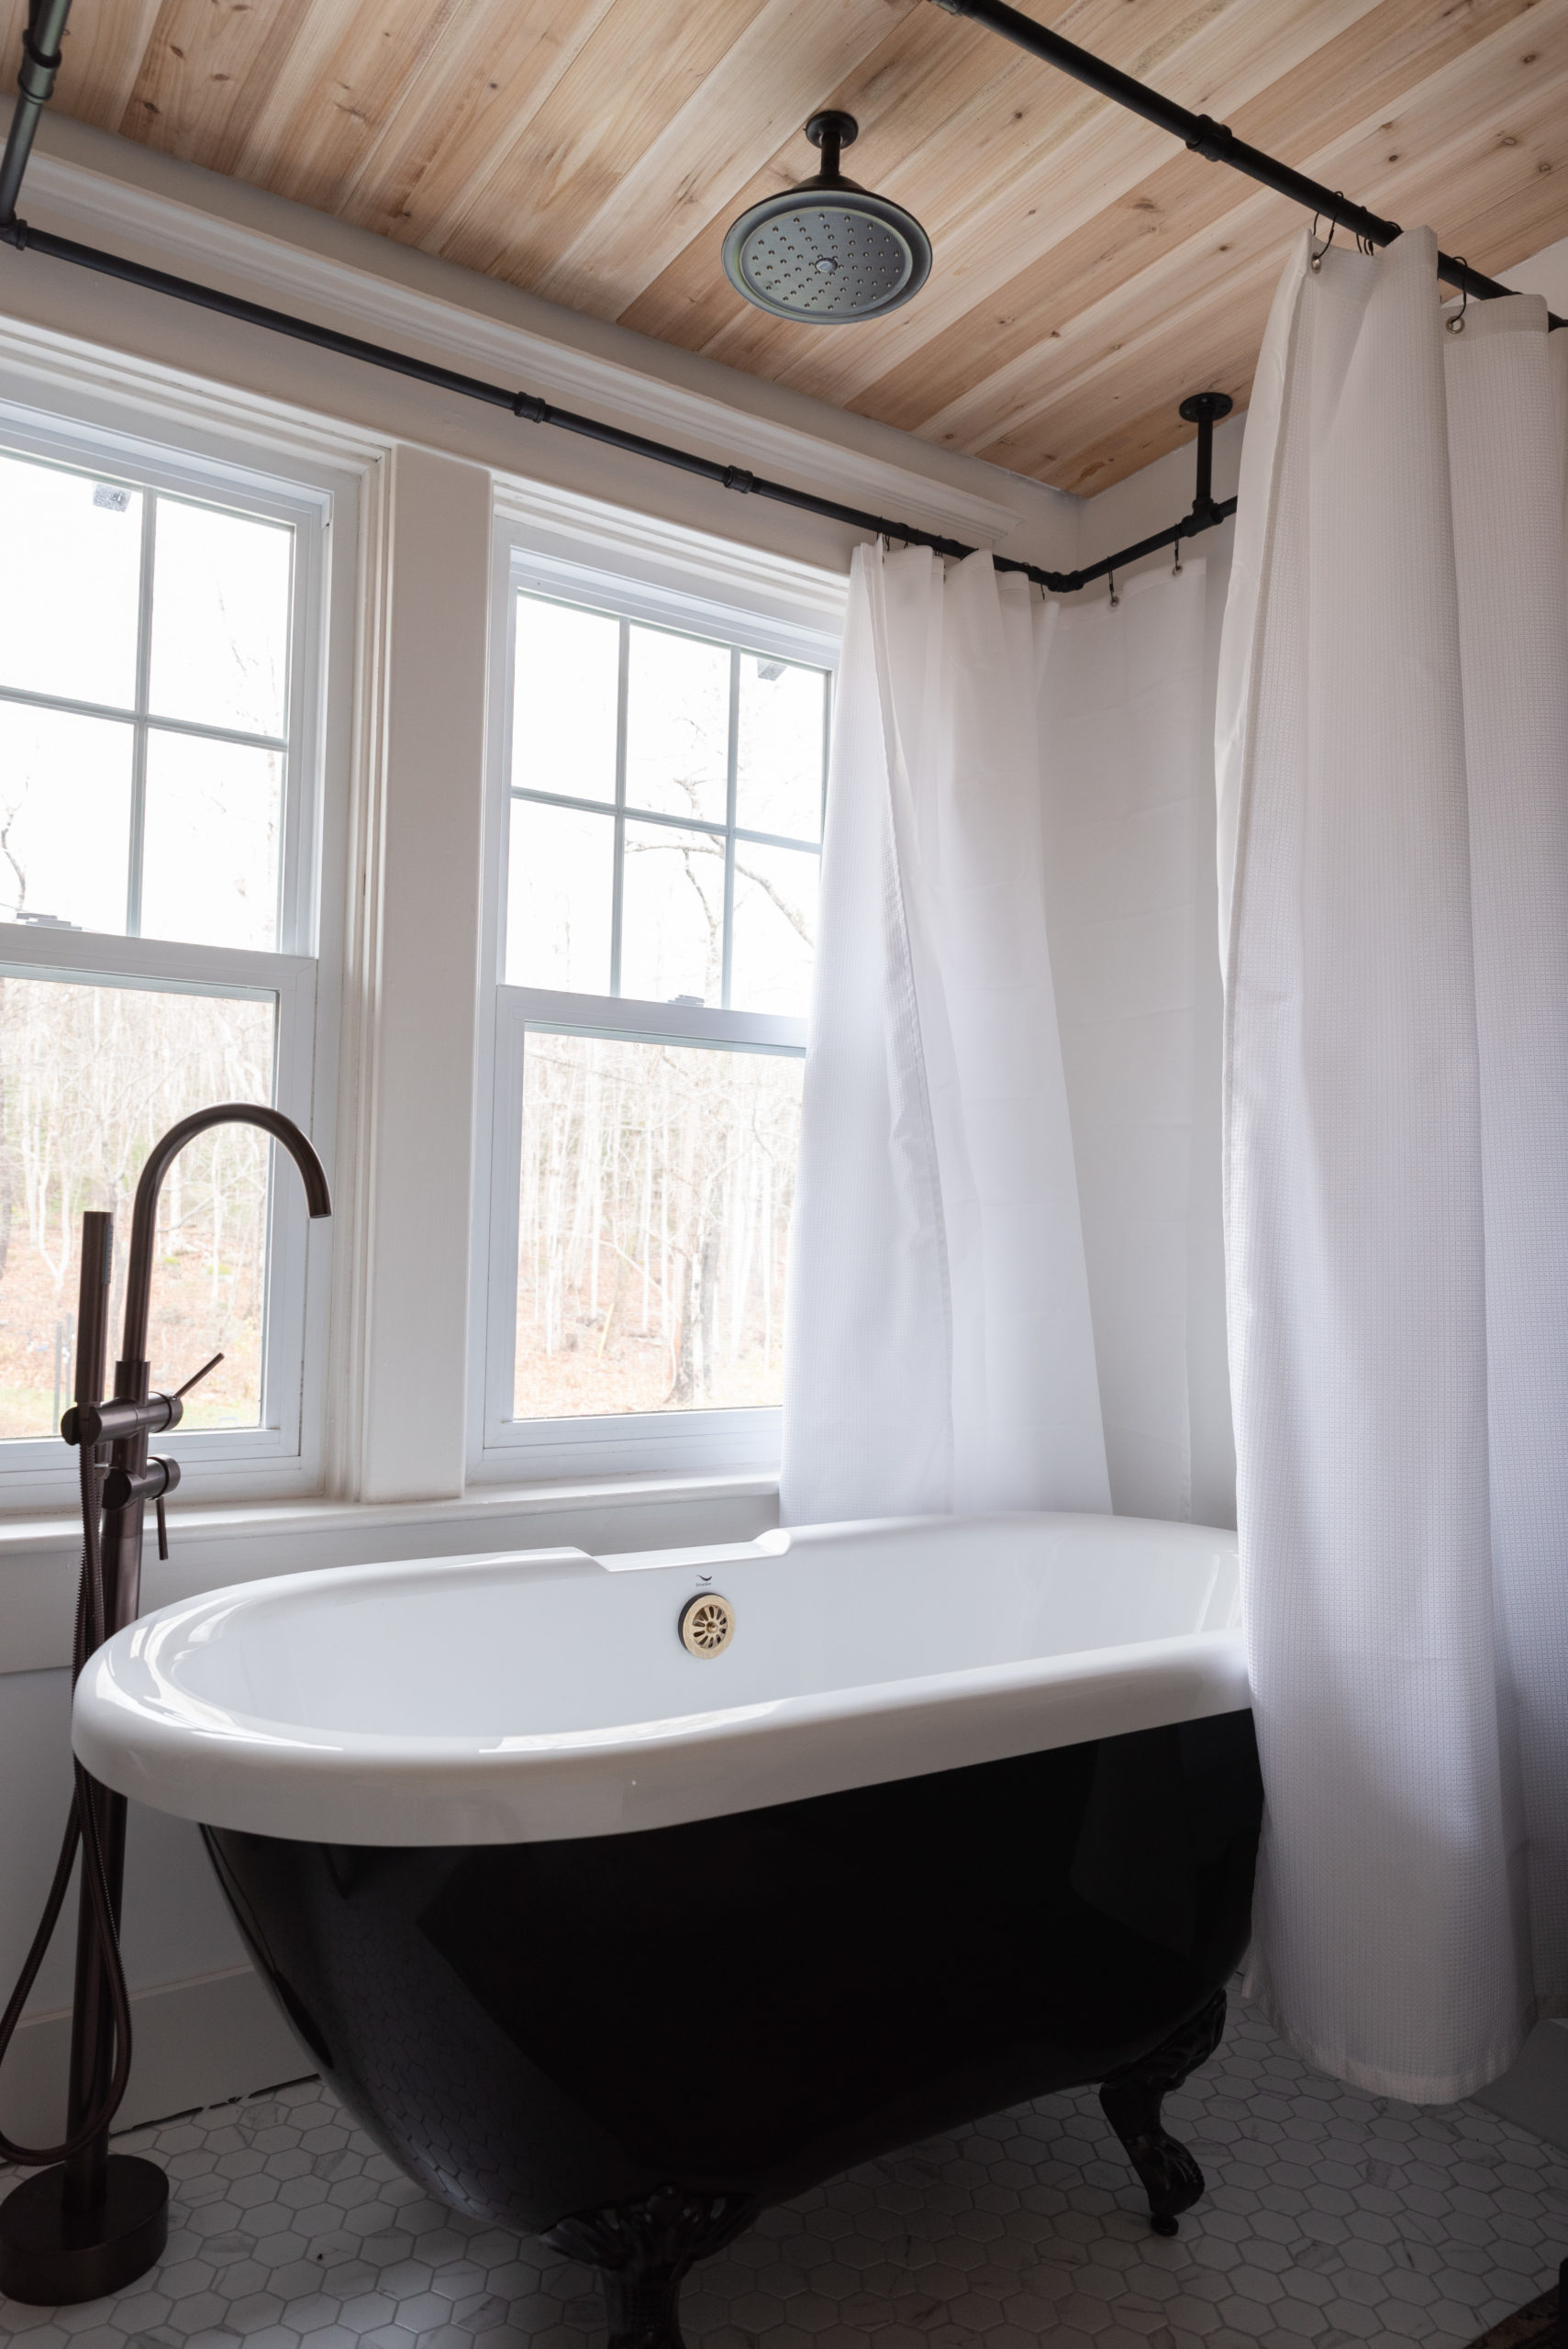
We started with totally gutting the room to the studs and original wide plank subfloor. We were also going to redo the ceiling but our plumber was worried our design for a ceiling mounted shower head would freeze in the attic, so we opted to keep the old drywalled ceiling and add a floating cedar ceiling with potlights to it.
The first step, while the whole room was opened up, was to get the plumbers and electricians to come in and do all the moving of those major things. Having it done at this stage, makes work quicker and easier. We were able to totally remove all of the old plumbing and add brand new options which made us feel much more confident in this old home. With electrical, it allowed us to add sconces easily, as well as the temperature gage for our soon-to-be installed heated floors.
Once that was done, we began building the room back up. Installing new subfloor first and then starting on the walls. The Home Depot Canada has a fantastic selection of insulation and ours needed to be fully redone. We ended up using a spray insulation on the outer walls to get the highest R rating we could in a 2×4 frame (nowadays it is a standard 2×6). We then used a soundproofing insulation on the interior walls as the bathroom shares walls with both kids rooms. After that, we were able to start drywalling. With the help of our friend, we cut and hung Blue drywall which is made for moist areas like bathrooms as it has a high water and mould resistance. We knew we wanted to do a wall treatment to the room eventually, but wanted to protect the walls until then. Mudding and taping was a lot more difficult and time consuming than we had expected, but with it being our first time doing it, I don’t think it turned out too bad.
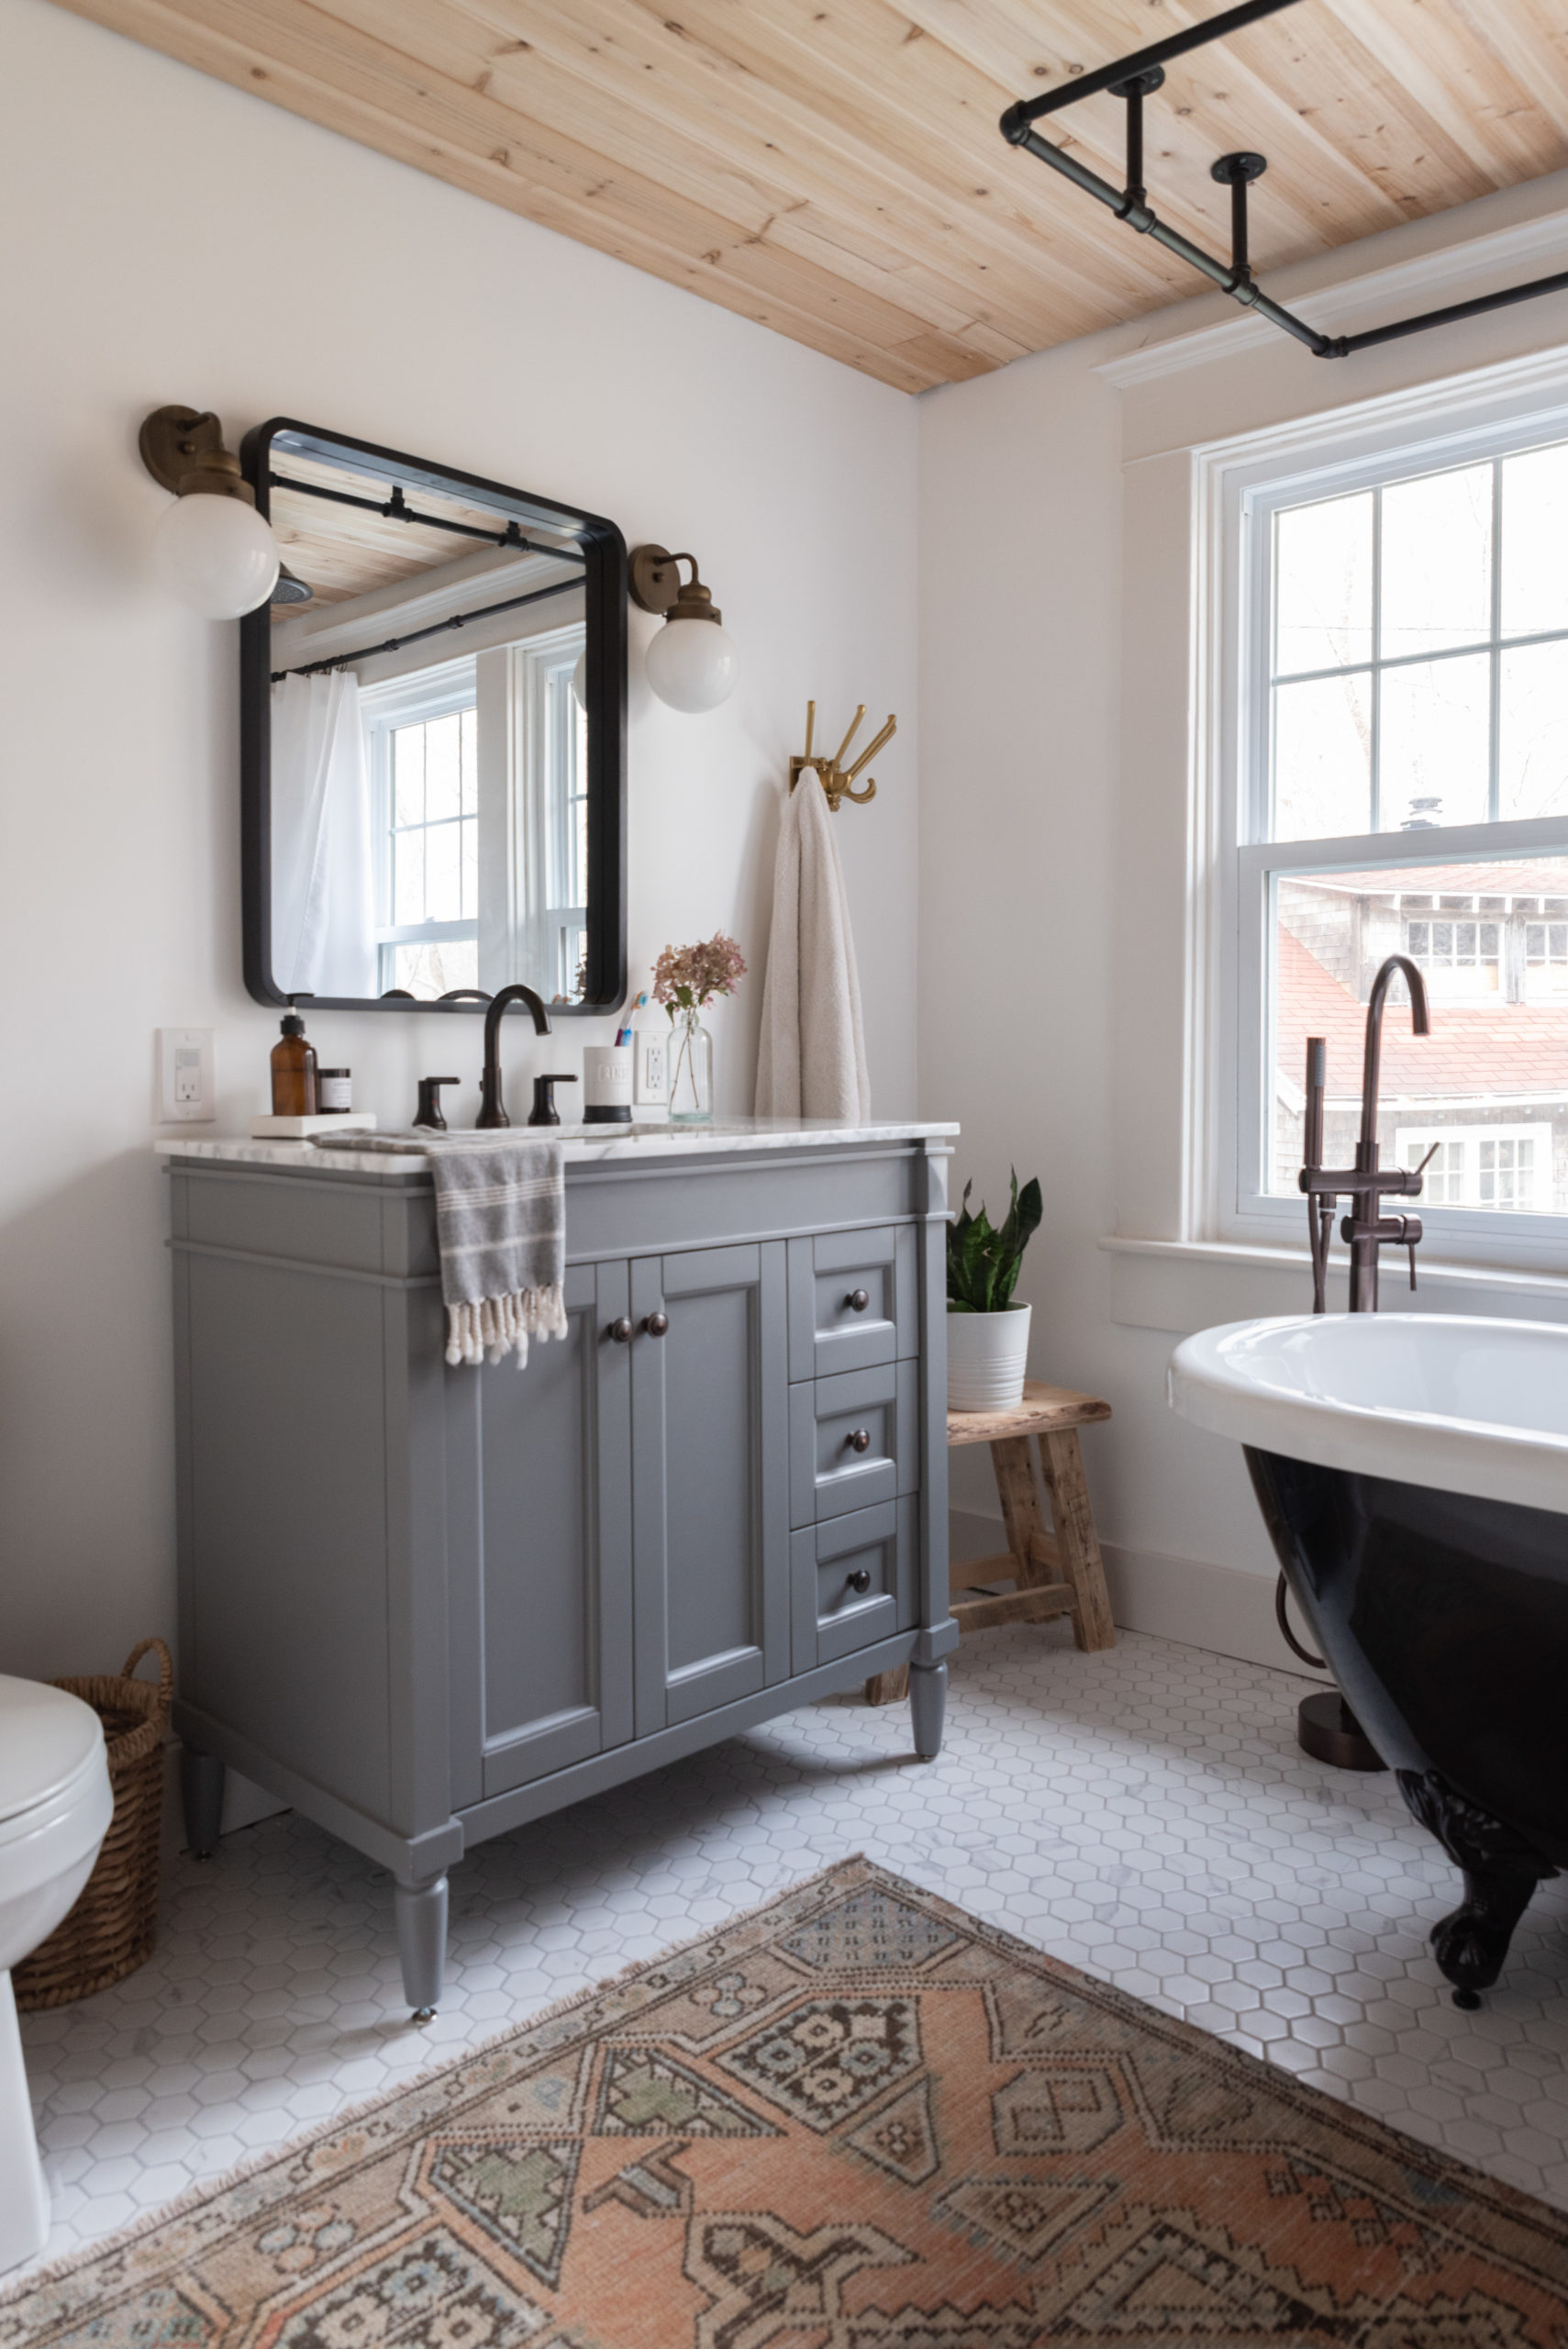
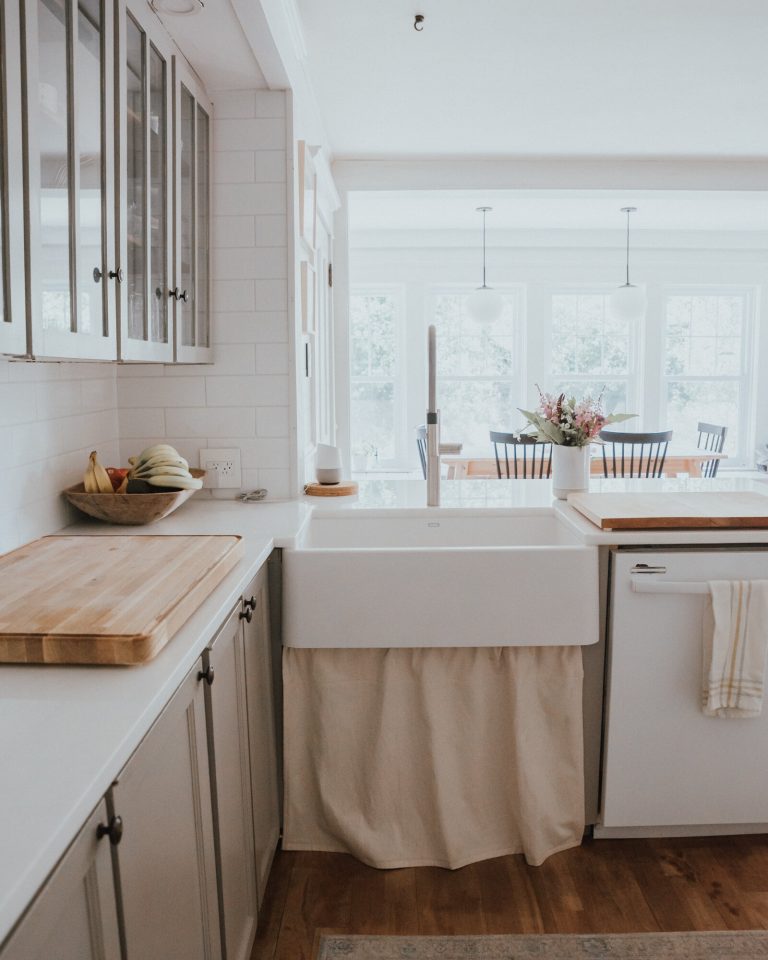
It was now time for the floors. We went with Schluter Ditra mat as we had installed it in our laundry room renovation and loved how it helped with tiles not cracking and waterproofing. This time we opted to install the Ditra Heat kit available at The Home Depot Canada so that we had heated floors in our always-cold bathroom. They were easy to install and tile on top of. For tile, we wanted it to feel lux but also flow with the laundry room. We opted for the same shape hexagon, but went smaller to make the room look bigger, and the marble look to add that luxe factor. We also opted for a light grey grout to match the grey in the marble vein of the floor and also the color of the vanity.
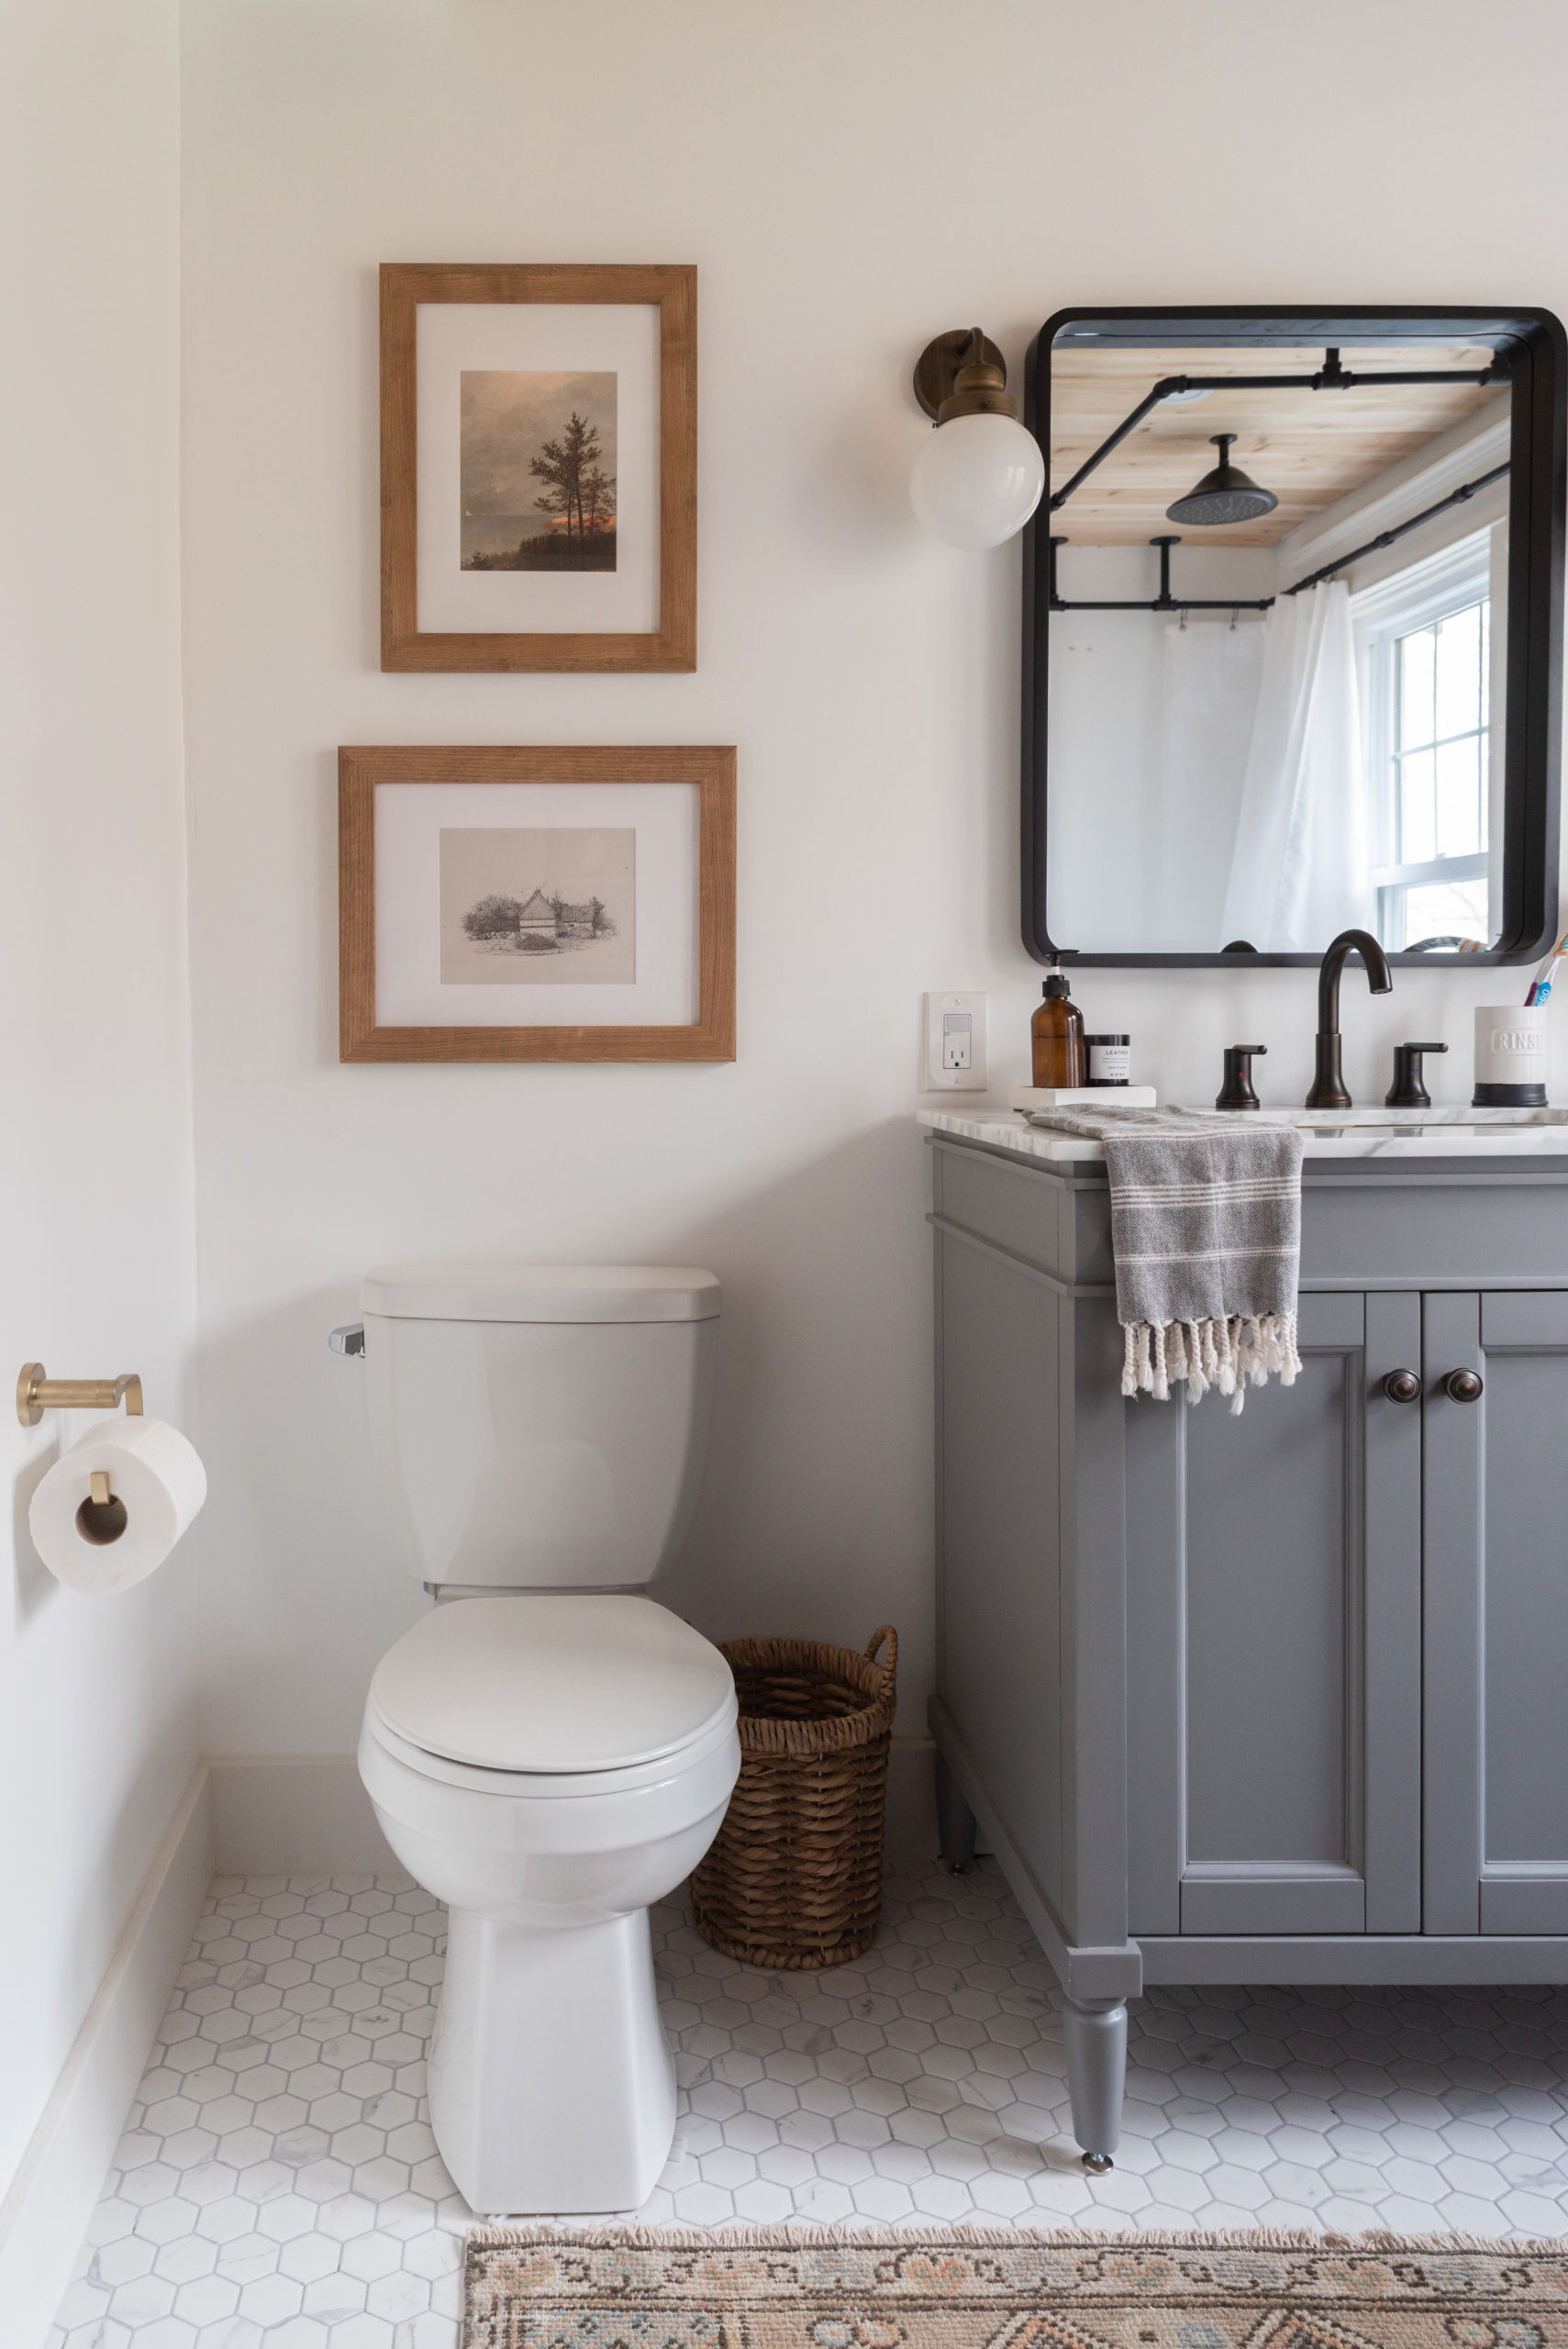
For trim, we salvaged the original-to-the-home trim from the bathroom and only replaced what didn’t survive being removed. We also matched the size of the trim with the baseboards, making them a wide 6 inches. Because flow was so important to us in the design of the home, we went with painting the trim ‘Shoelace’ by Behr to match the rest of the home, and the walls ‘Ultra Pure White’.
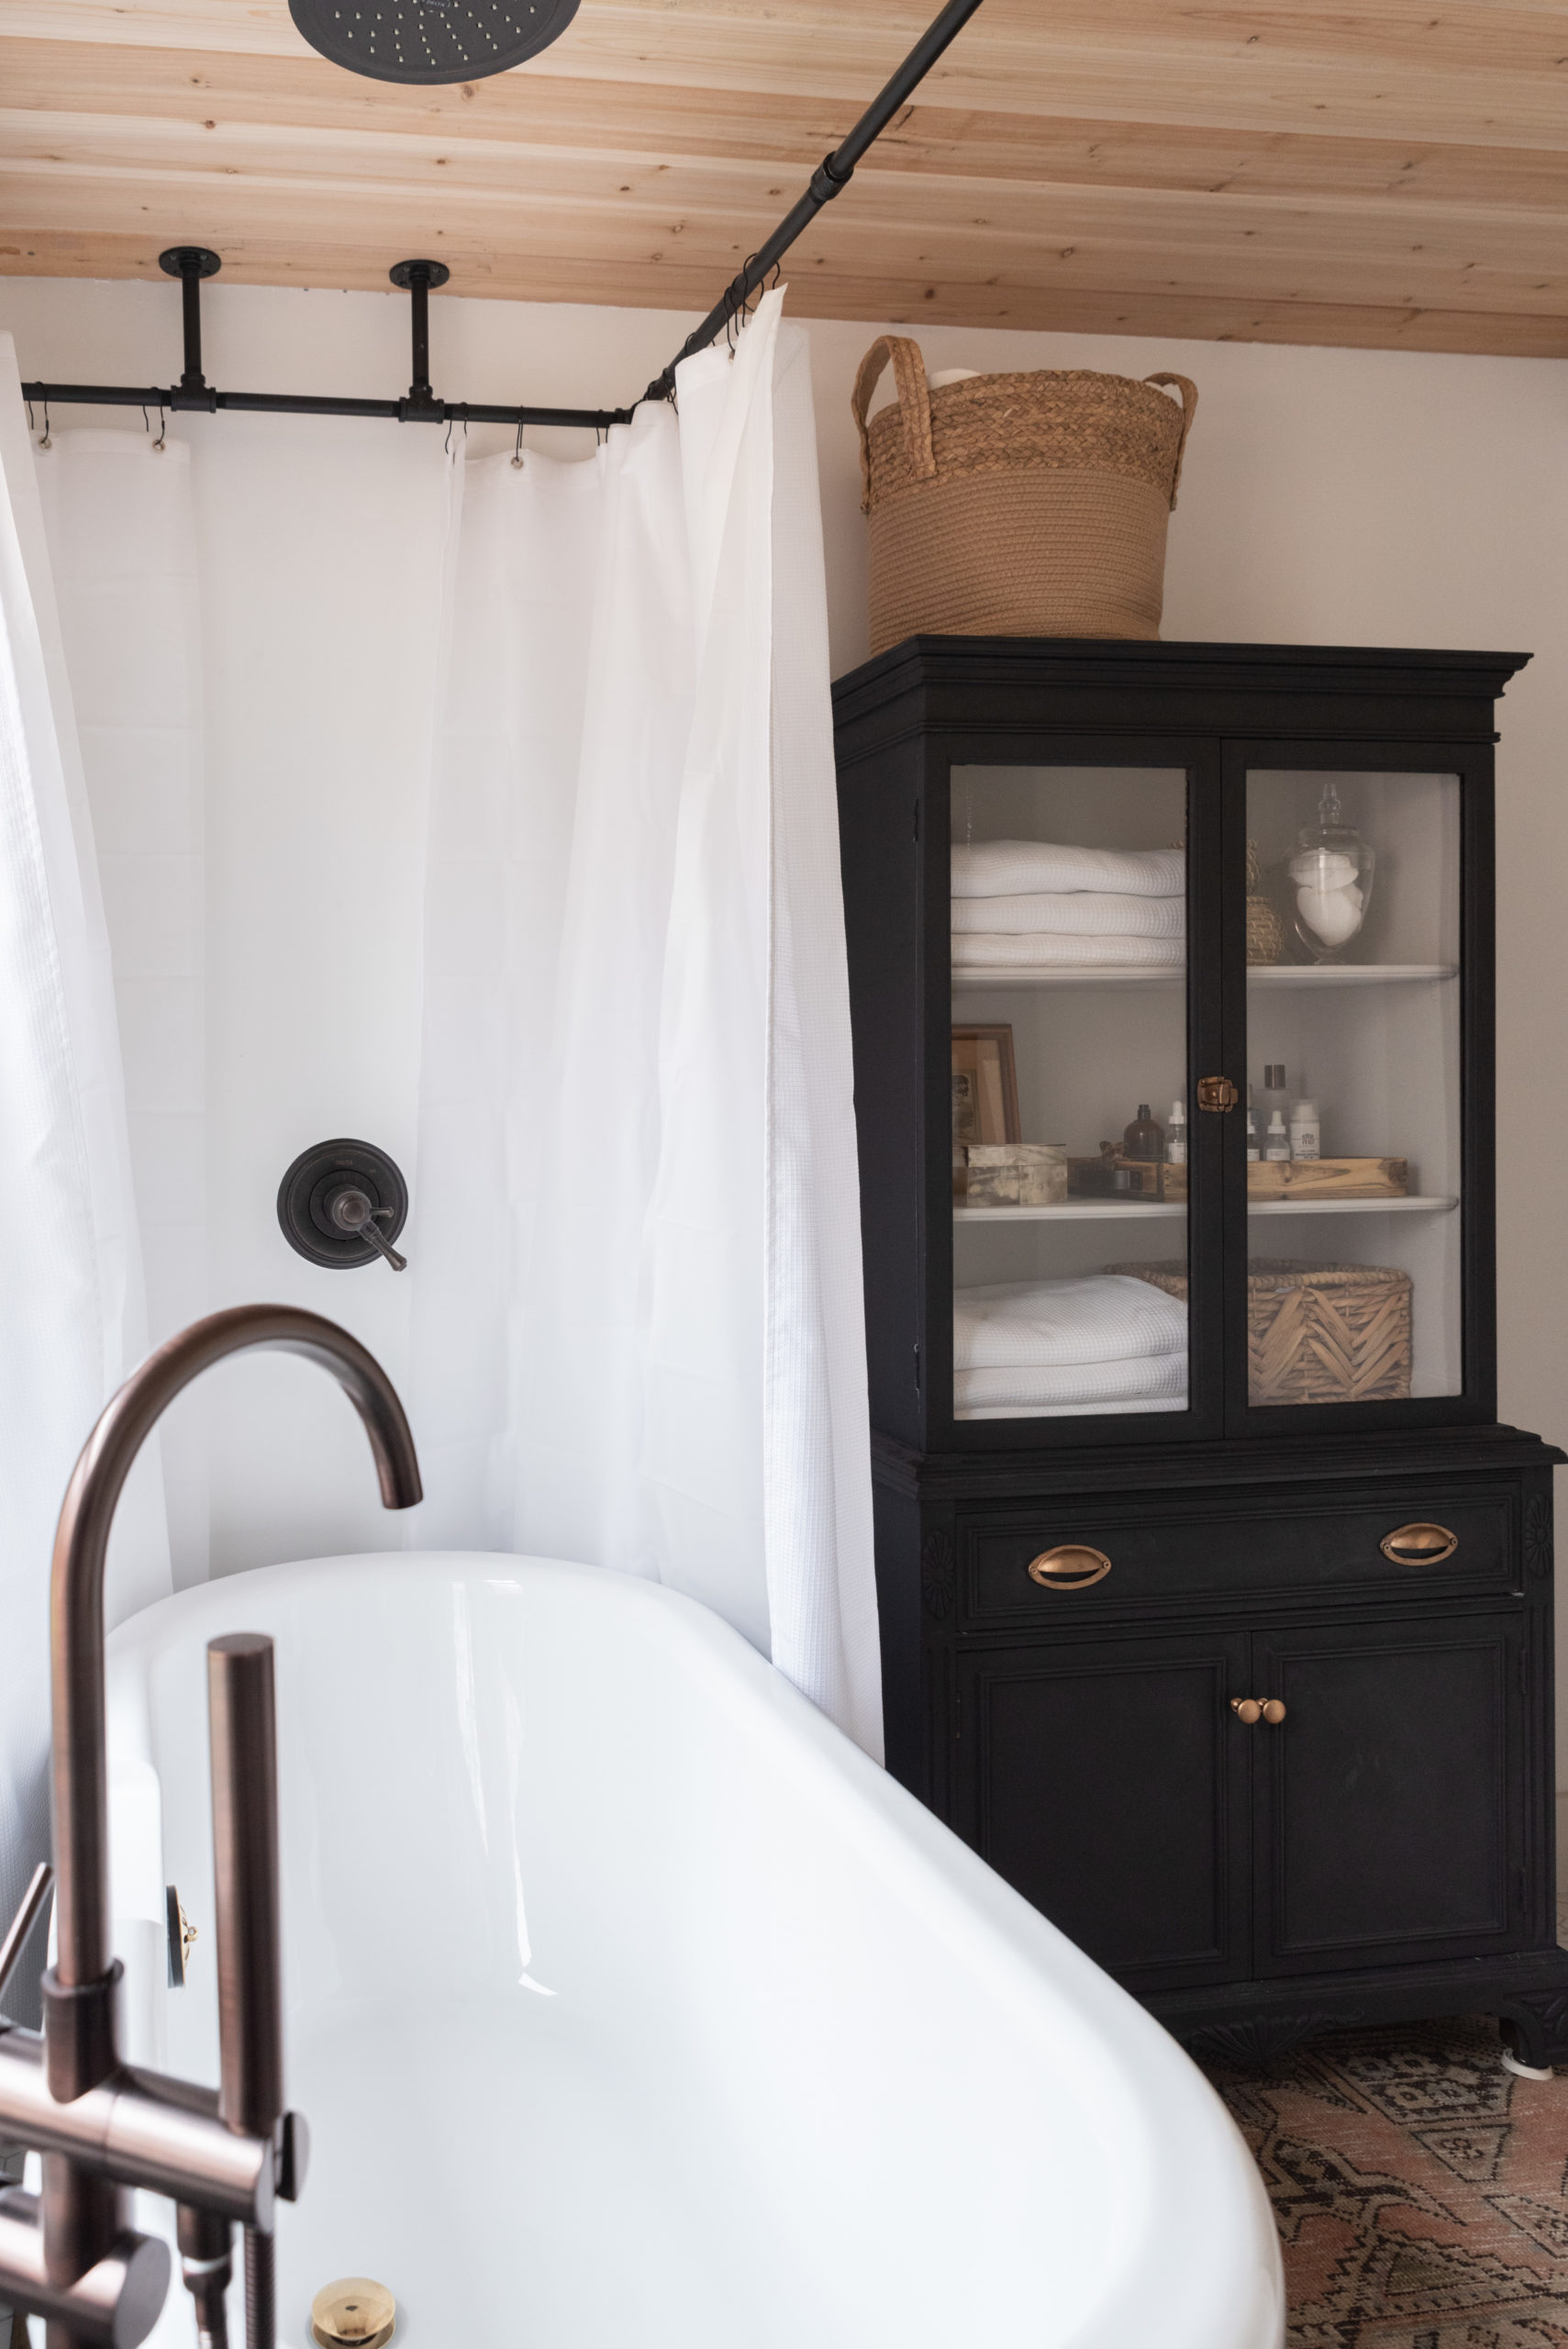
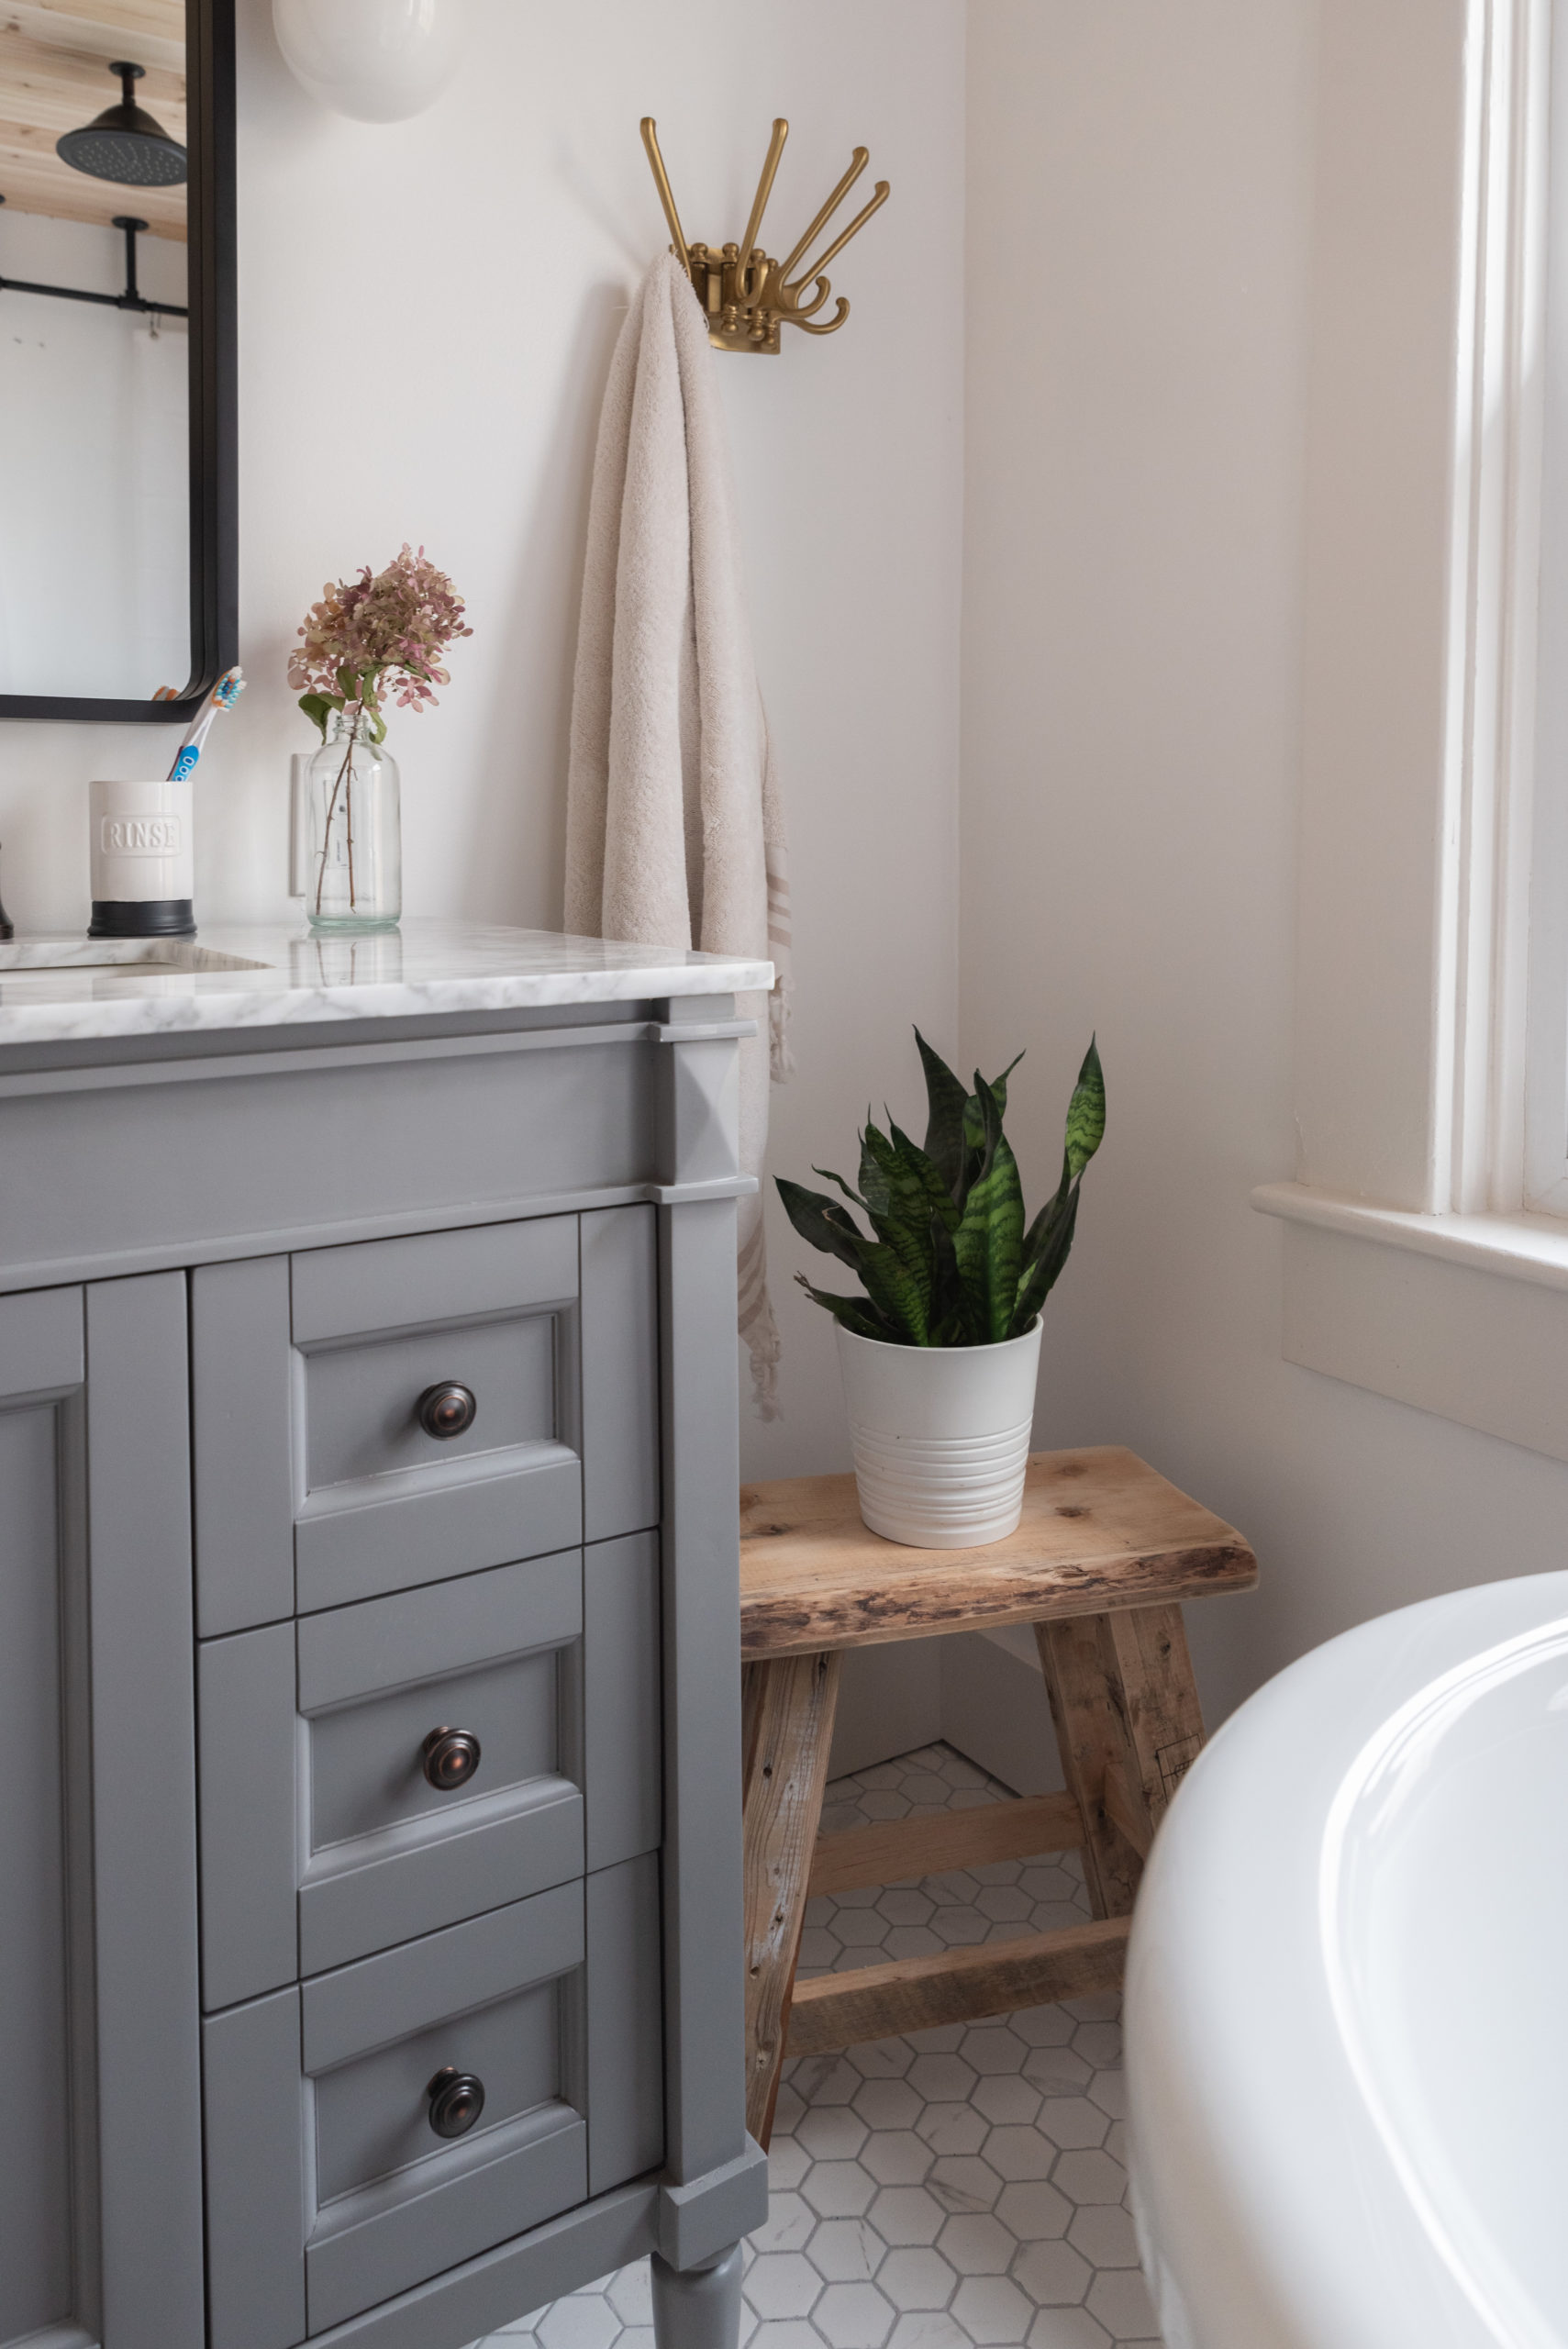
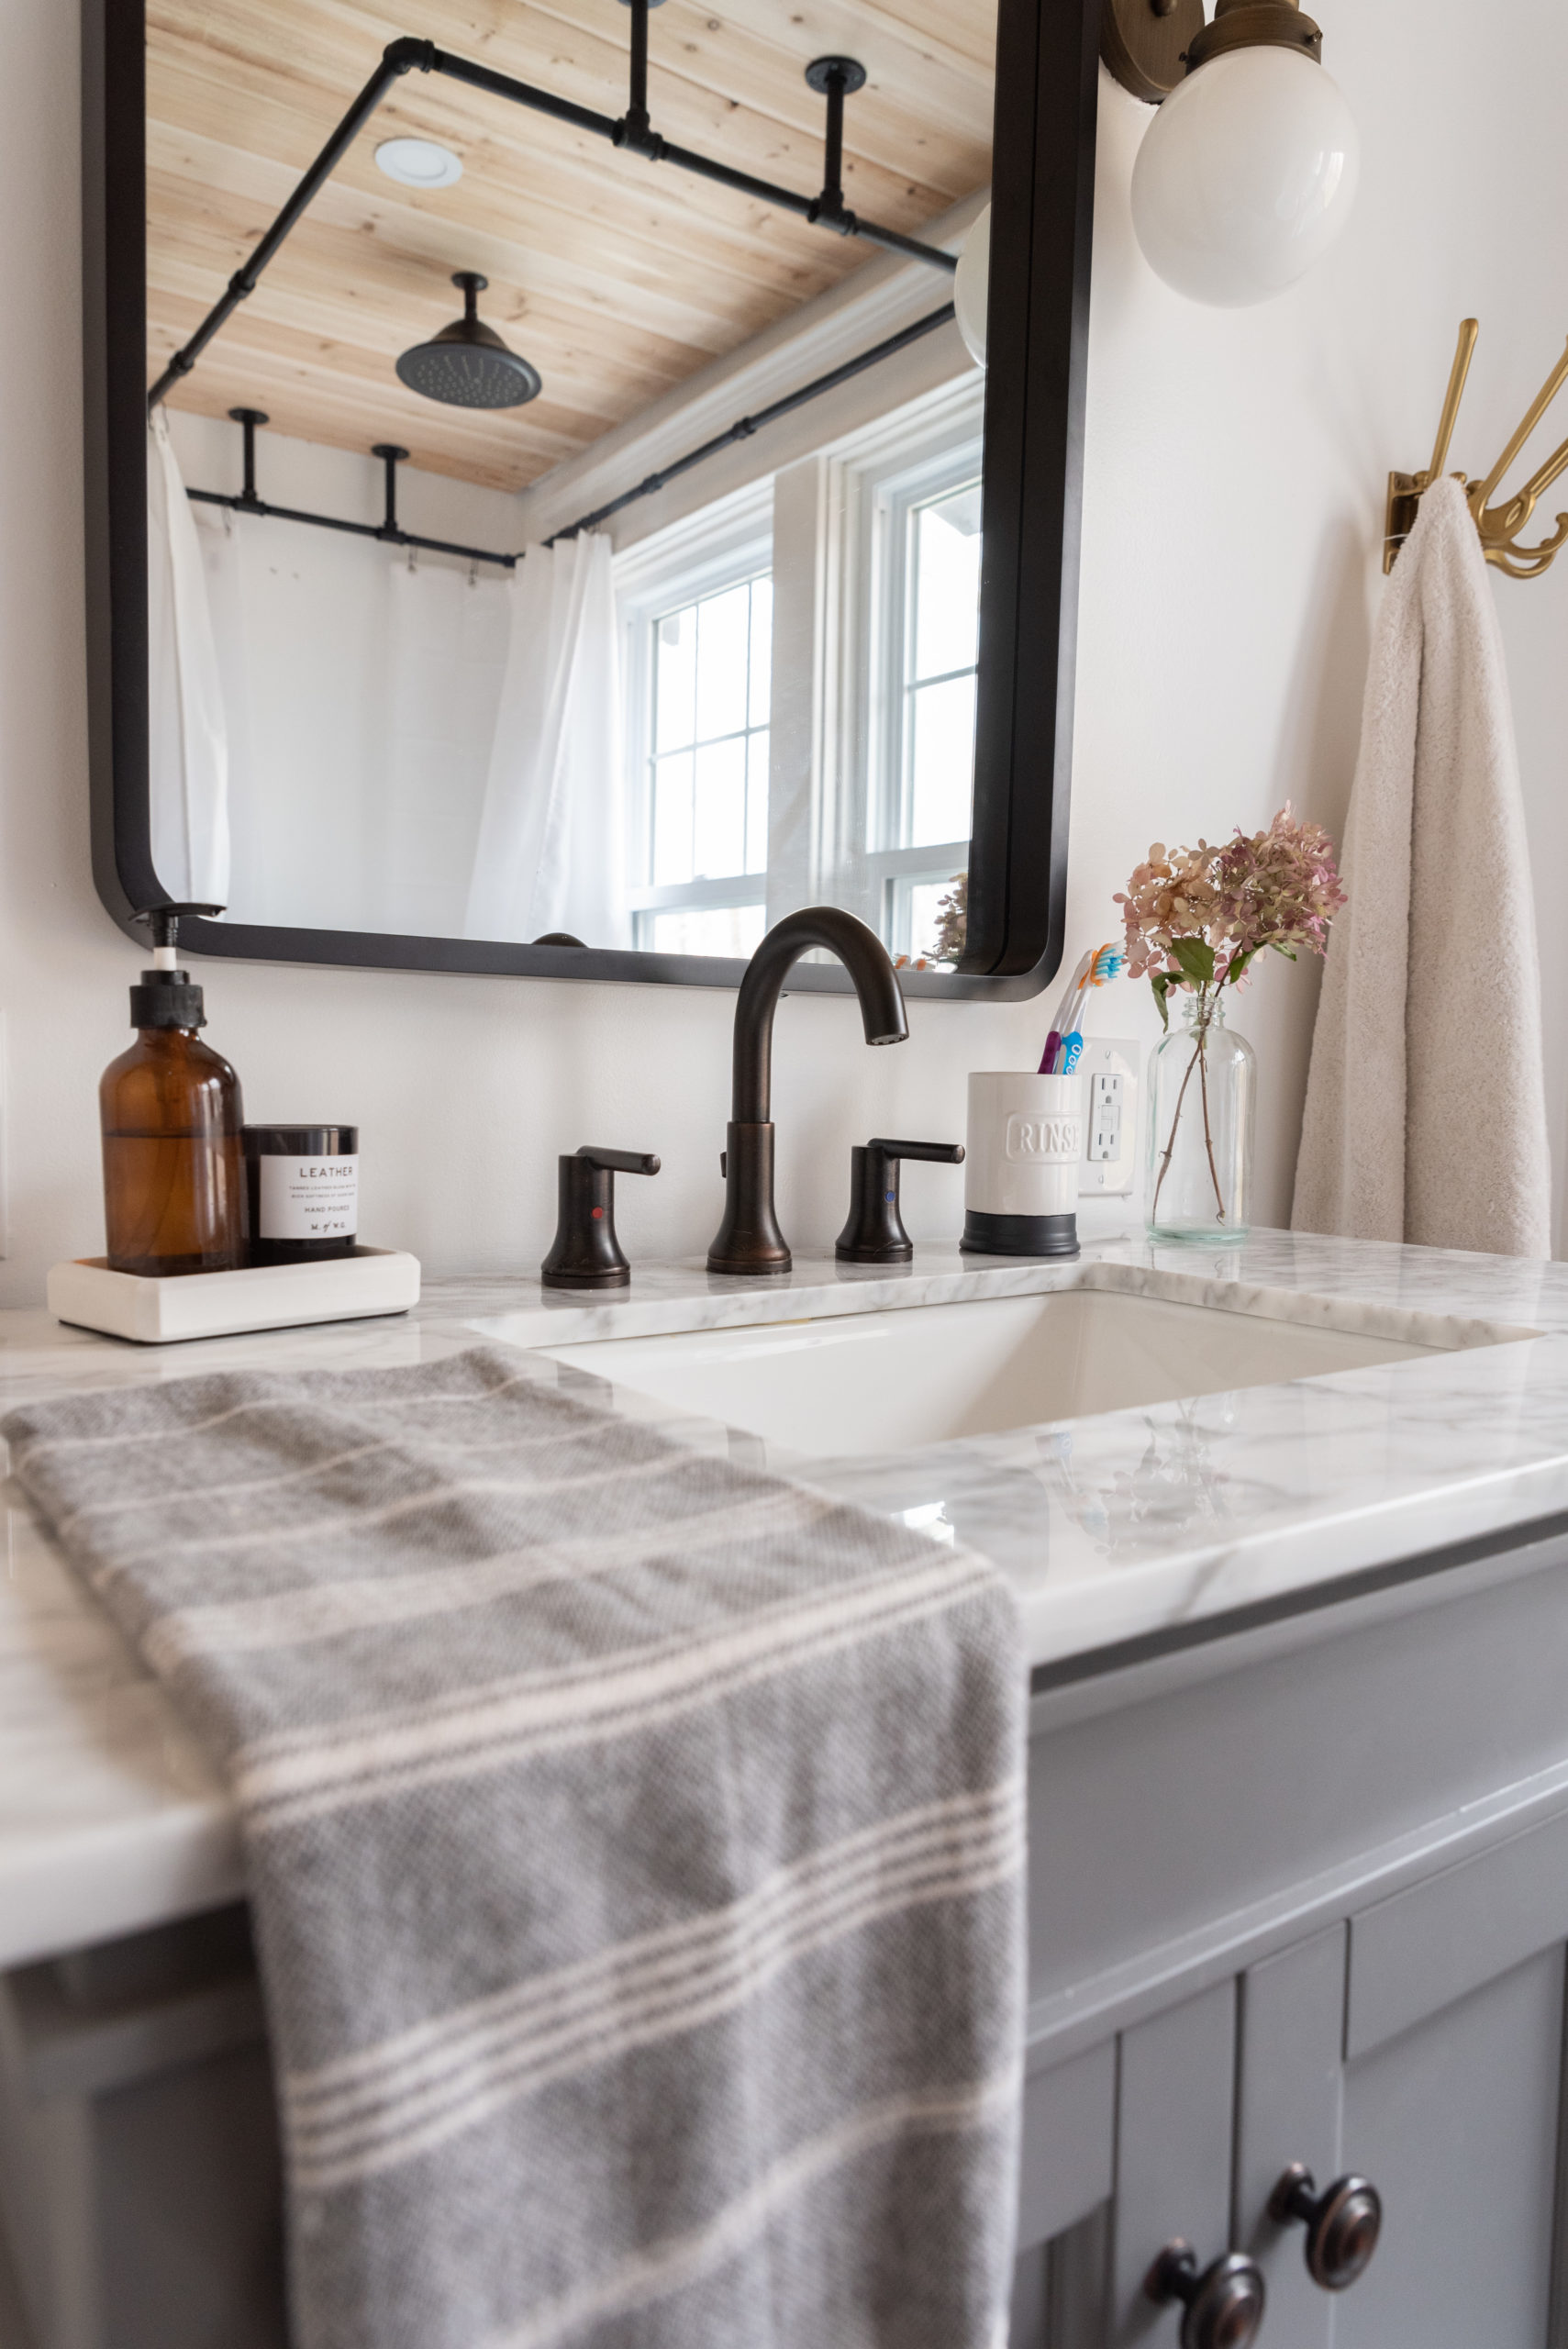
Now it was time to install the finishings that all came from The Home Depot Canada. The tub, a smaller size than originally planned for due to such a small space, fit perfectly and the vanity has the perfect vintage vibe but also high enough that Rob, who is 6’6” doesn’t feel like he needs to fold in half to reach it. For a shower curtain rod, we opted for a DIY Rob pieced together from The Home Depot Canada’s plumbing section out of steel pipes that we then sprayed black. It adds a touch of industrial to a very modern feeling bathroom and also allows some extra room when we shower which is always lovely.
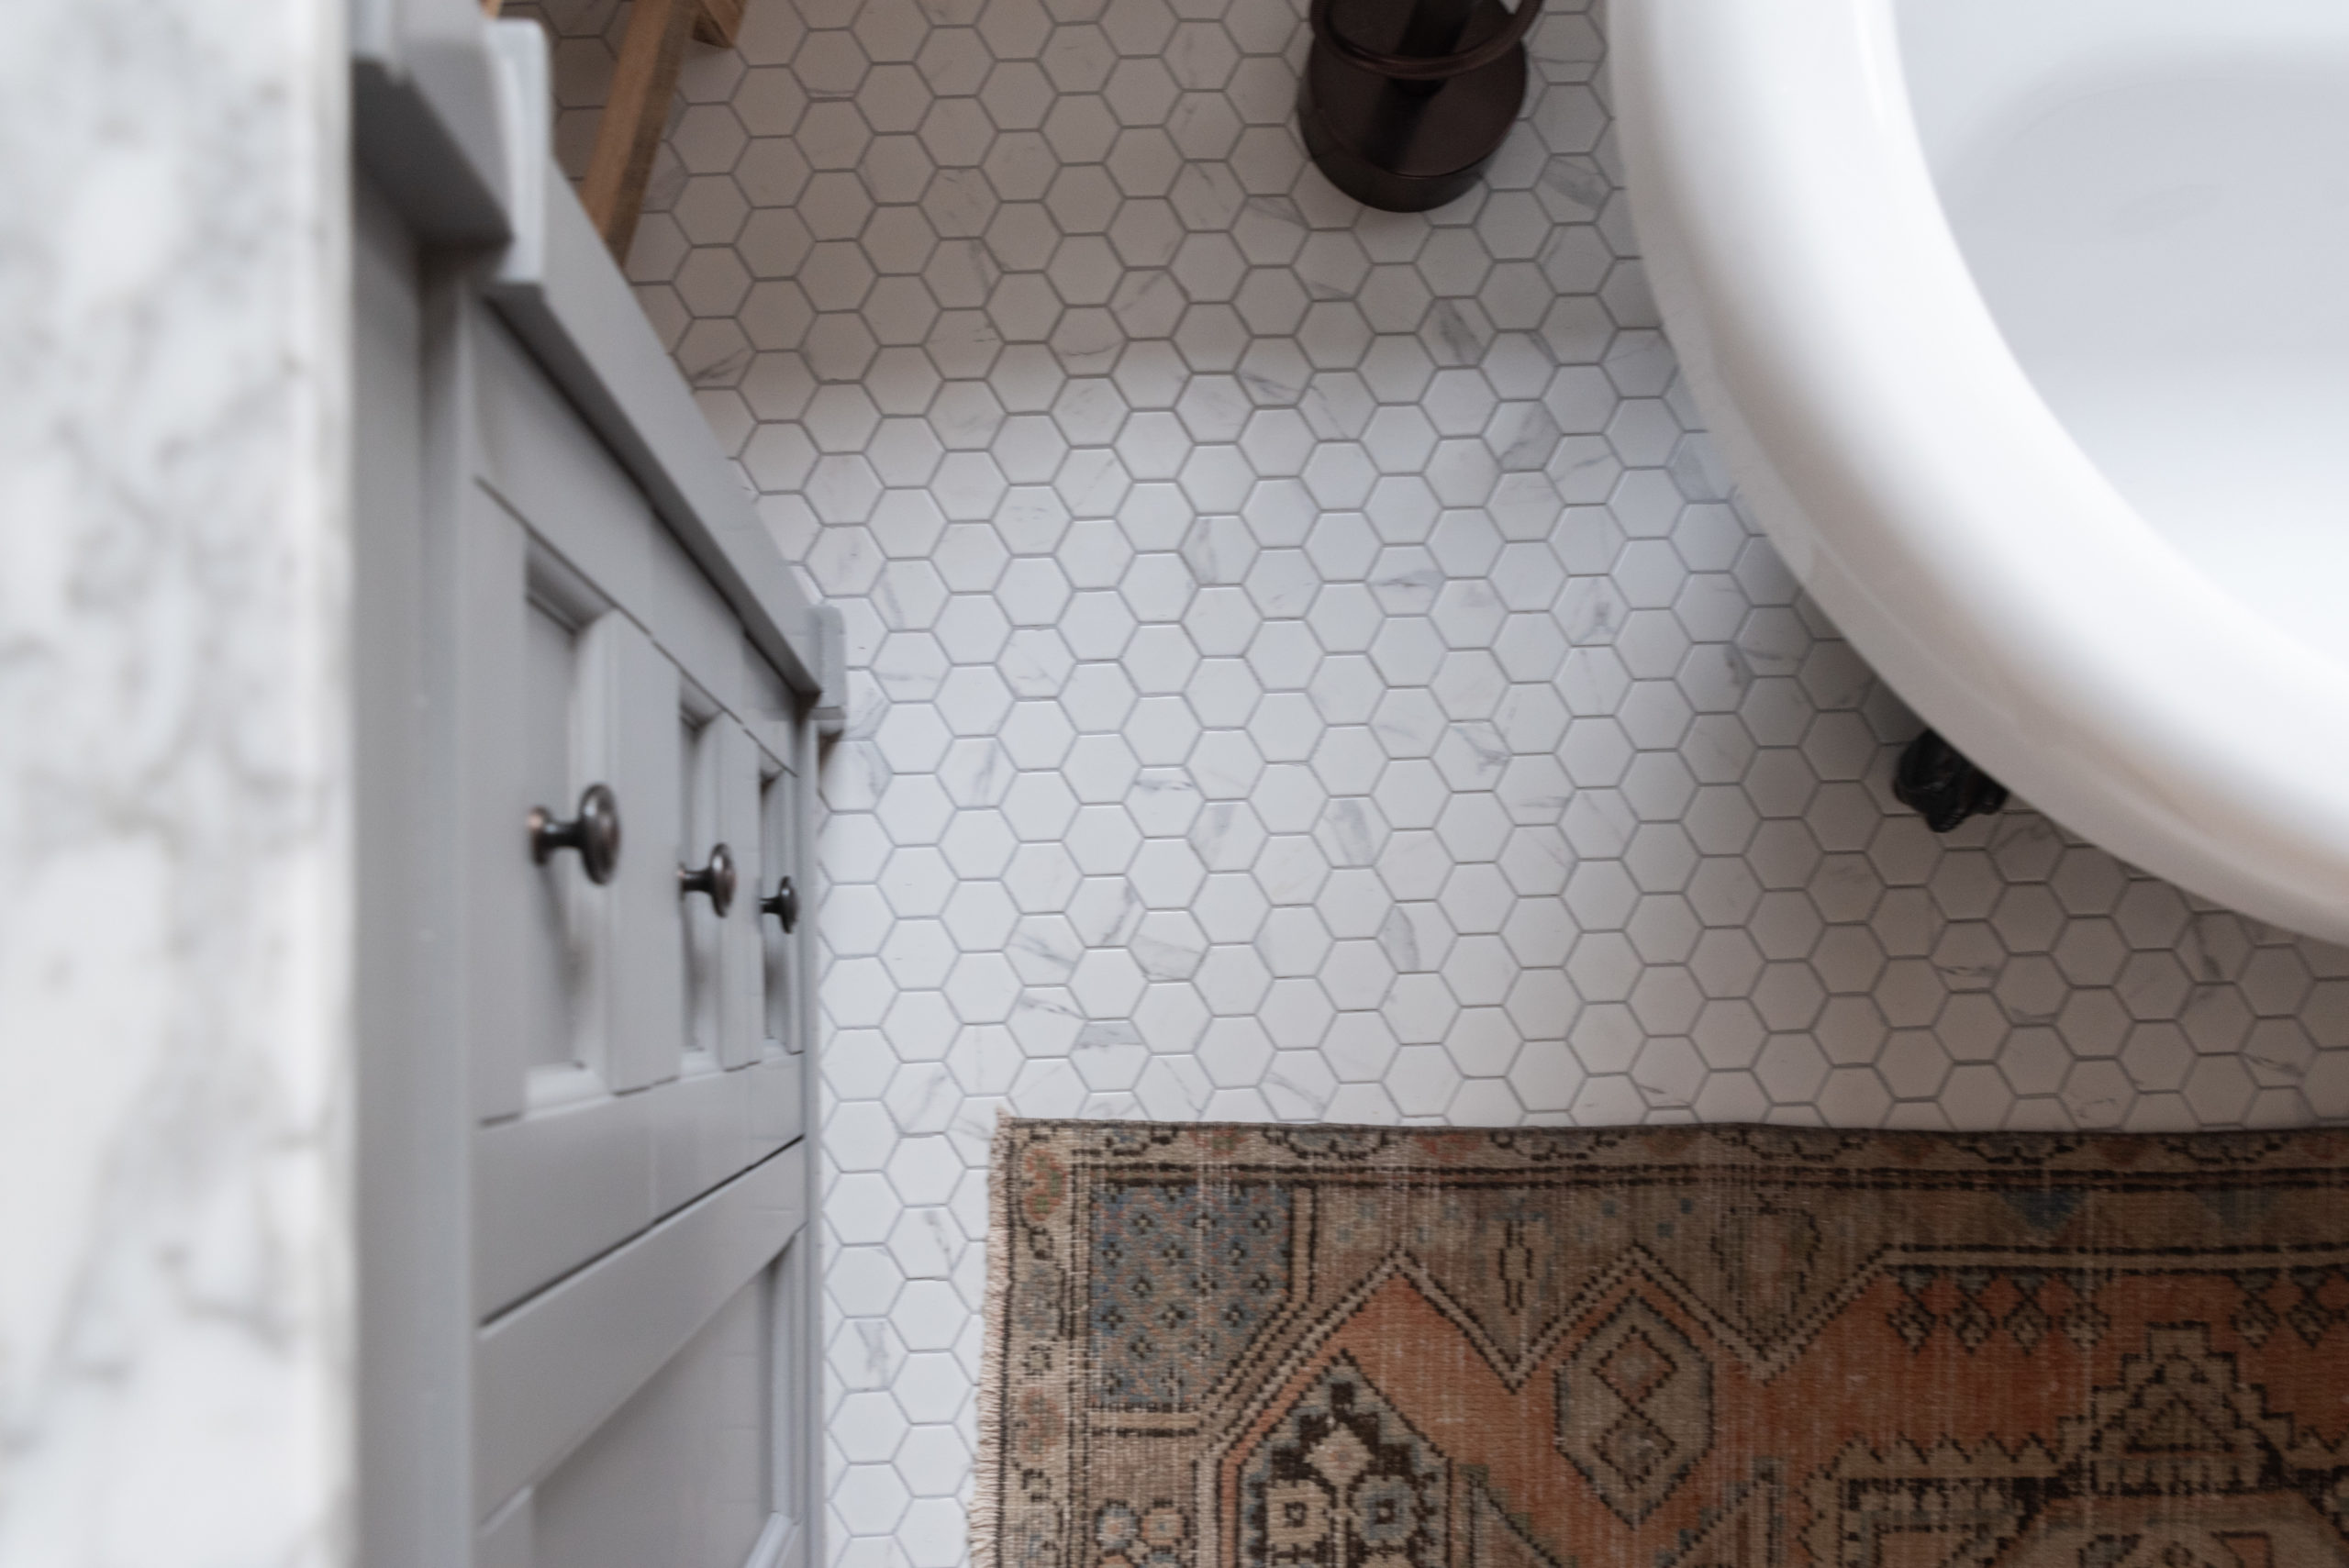
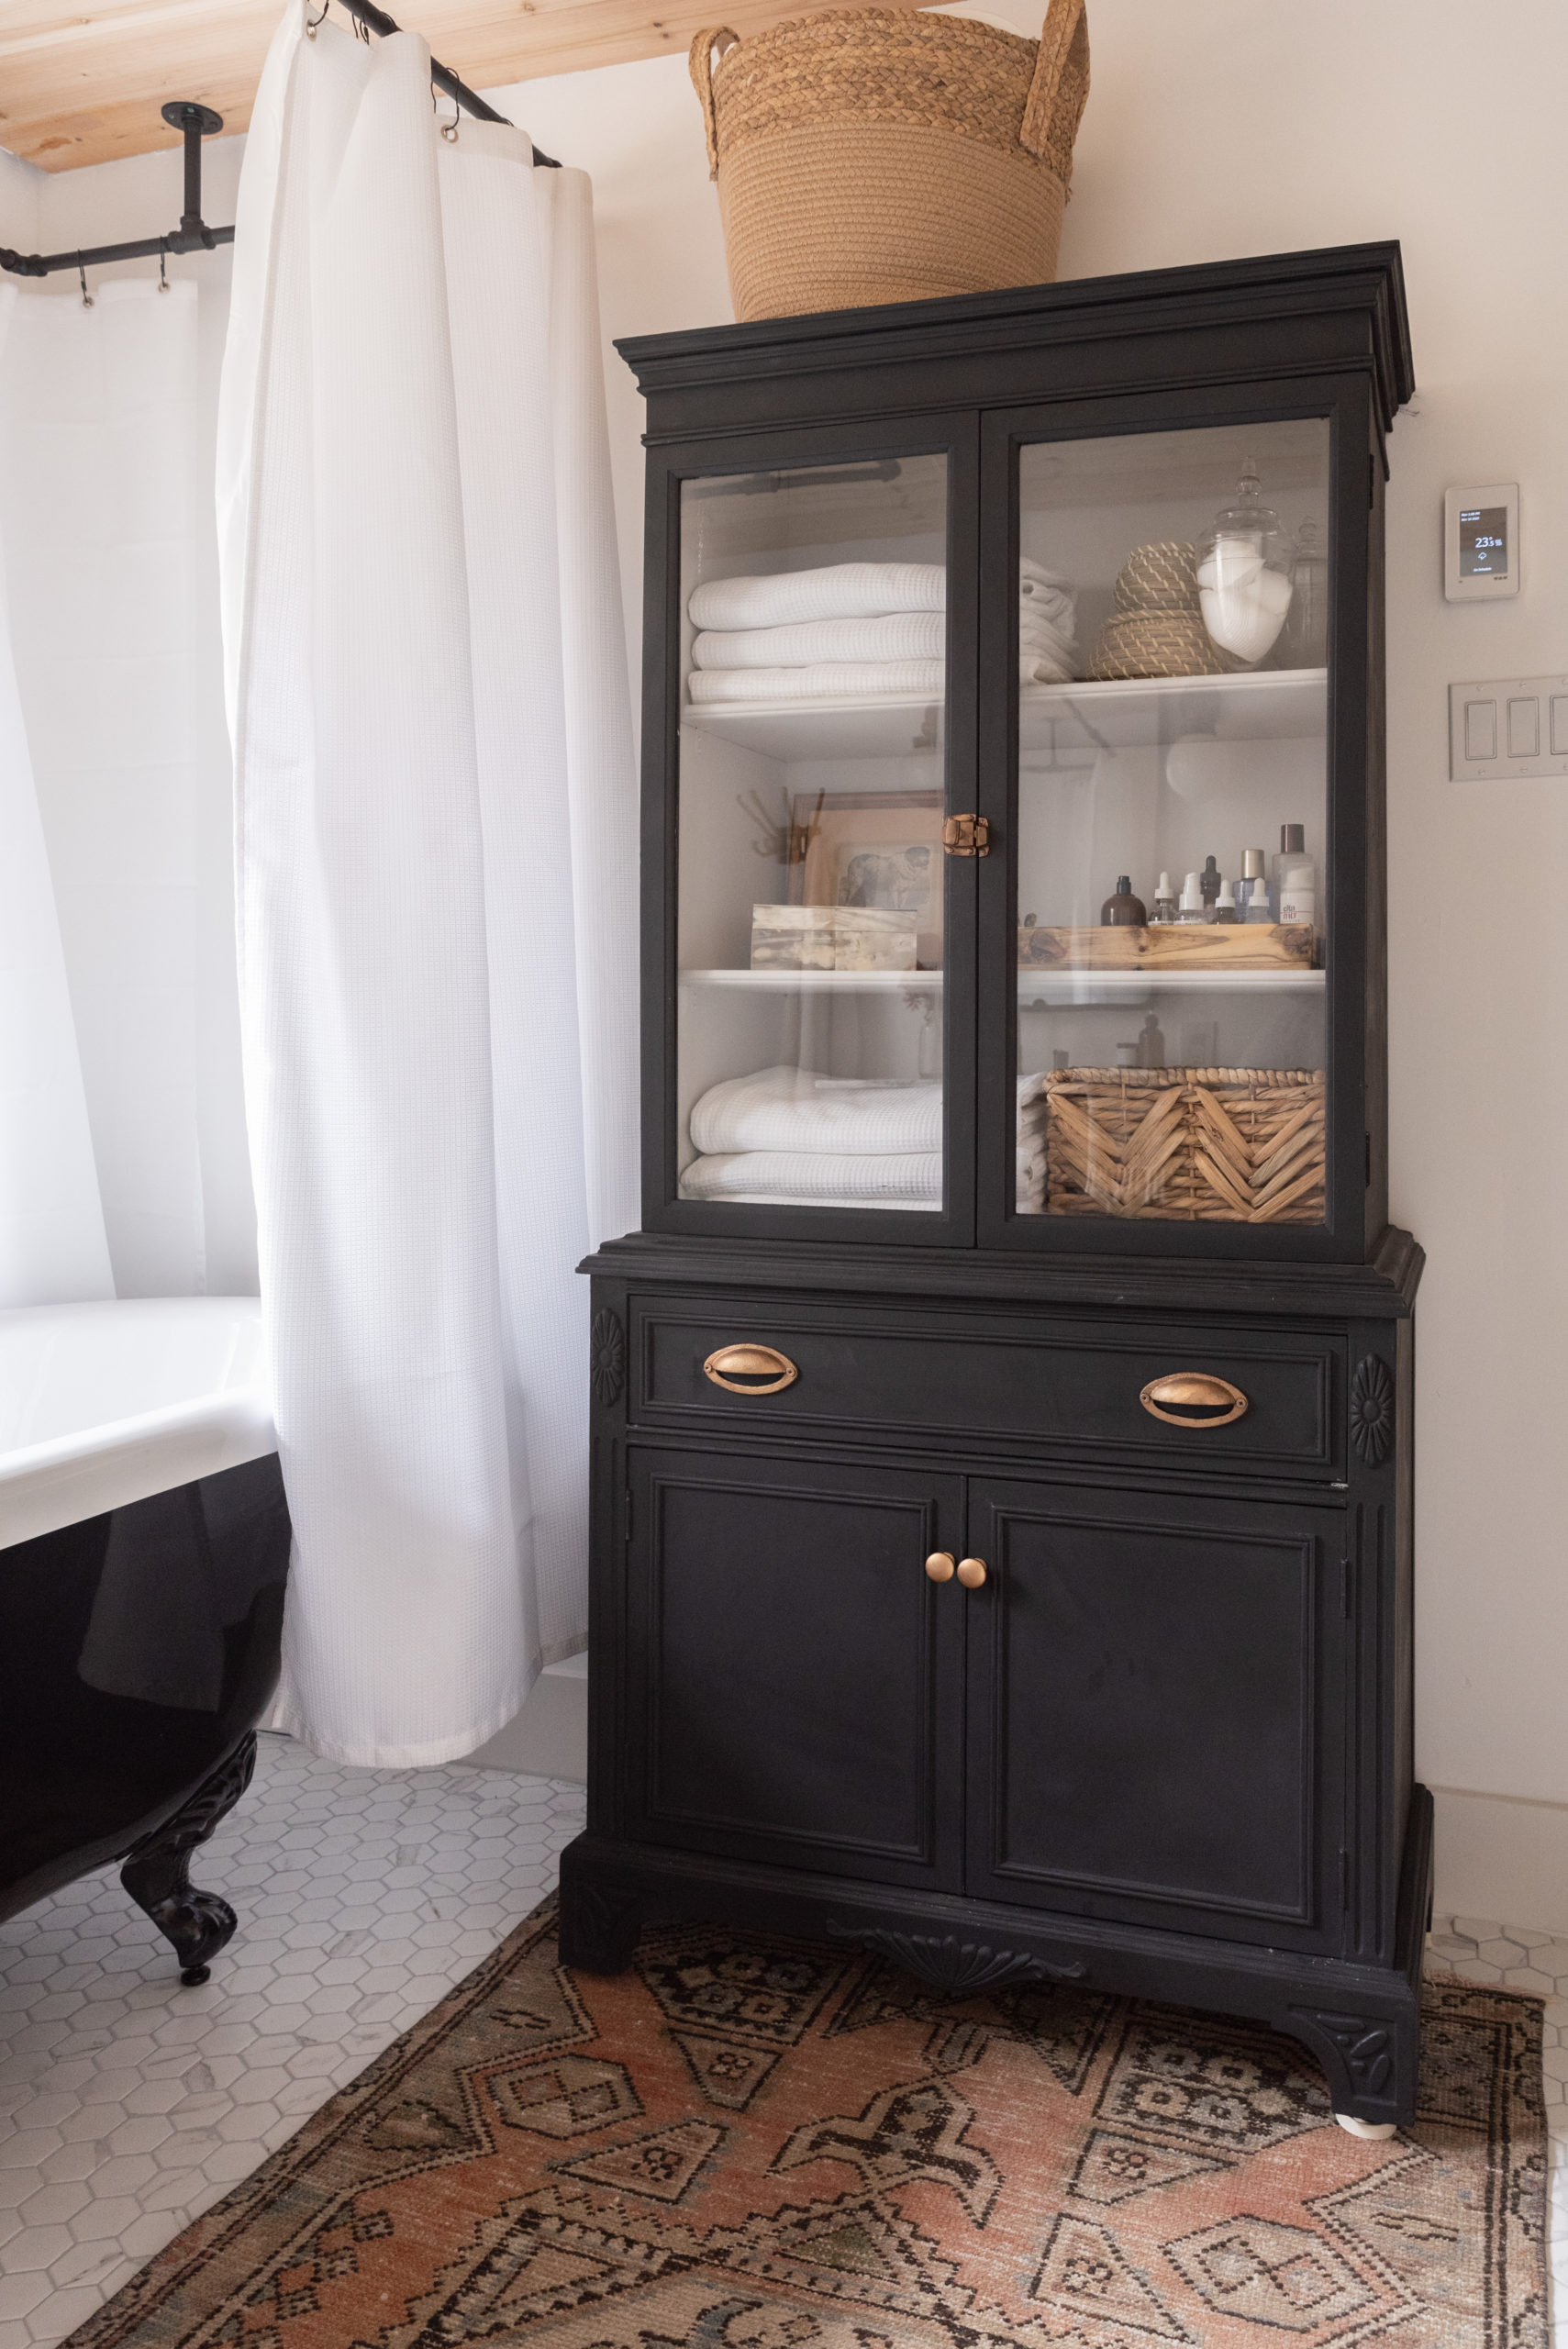
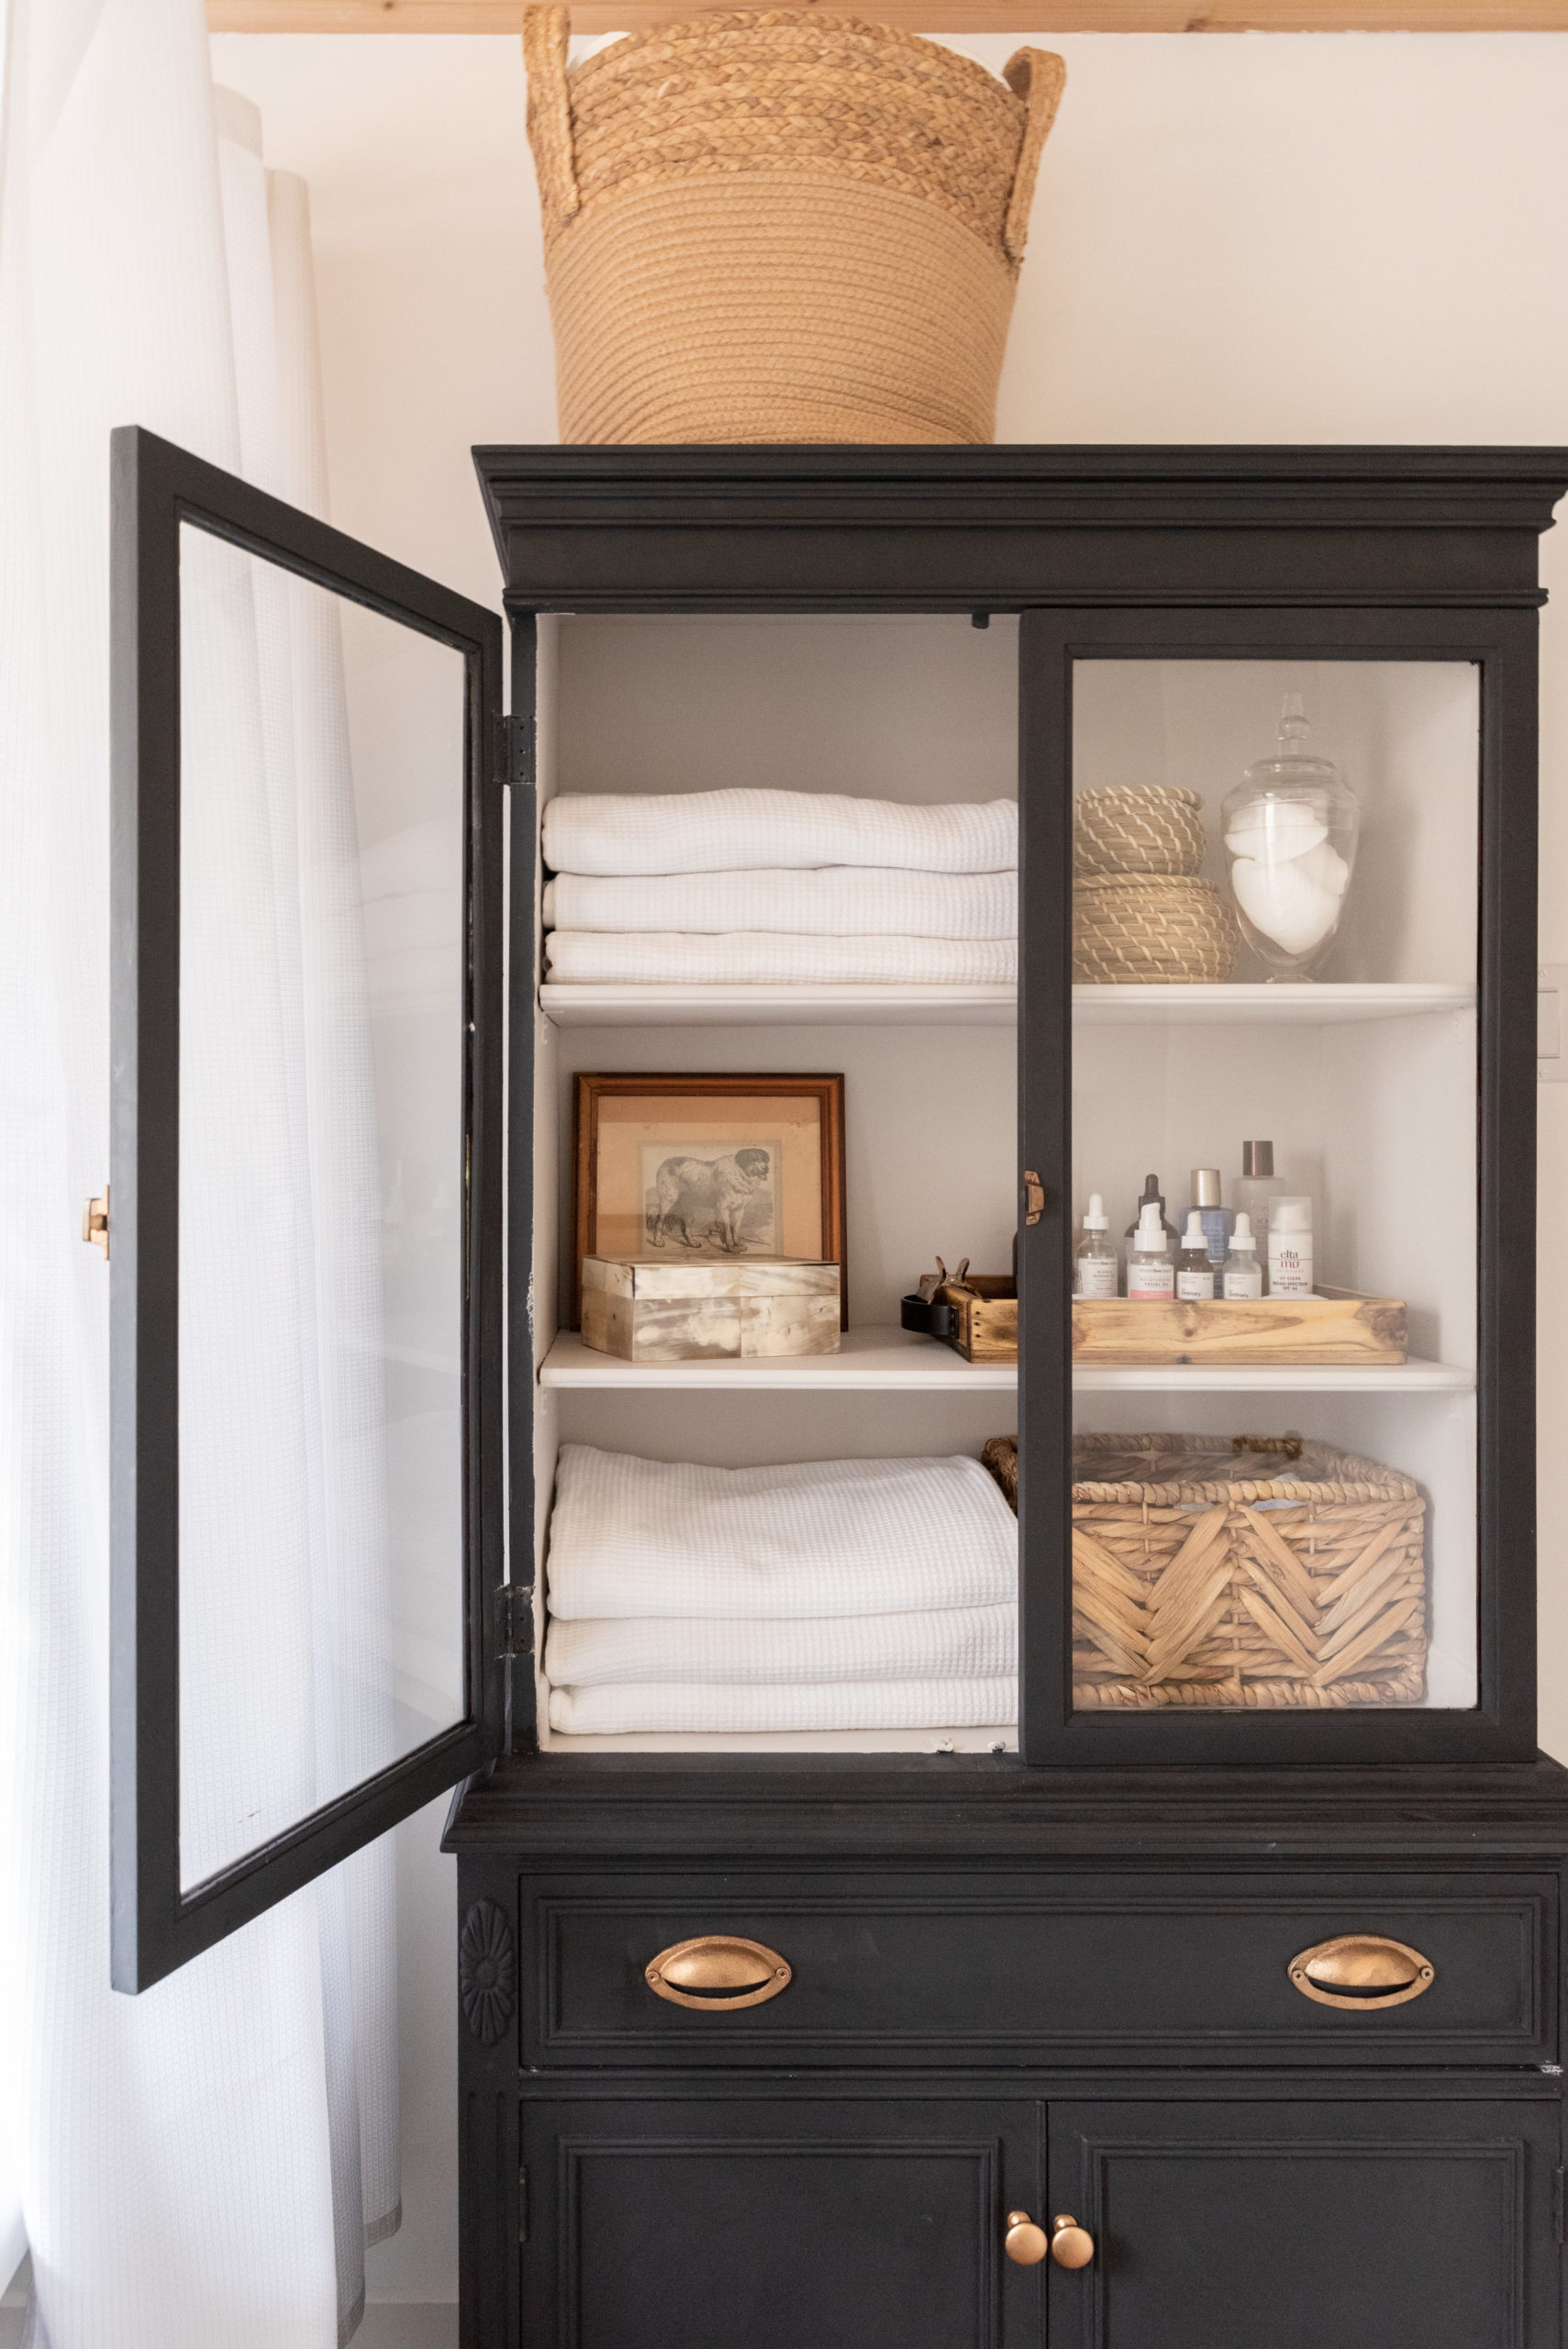
The antique cabinet I refinished from Facebook Marketplace fit perfectly between the tub and door and is going to be a great place to finally have proper storage in the room.
We are so happy with the end project which totalled around $9,000. Not only does it now suit our home so much better than before, but the function of the space has taken a whole new turn. We have proper storage, a warm room, and a place to escape from the world (and the kids).
Linking everything that we purchased from Homedepot.ca below to make it easy for you to find.
So what do you think about the space?
Katie-Rose
Thanks to The Home Depot Canada for supporting our family by sponsoring this post.


Homeowners should read this article.
This is very informative, thank you for sharing this.
Can you share what grout color you used on the floor?
Can you share what grout color you used on the floor?
Can you share what grout color you used on the floor?
Can you share what grout color you used on the floor?
Can you share what grout color you used on the floor?
What a great article. I love your cabinets. The color is to die for. I’m trying to get a fresh cabinet painting soon in my own place, and seeing your design was really helpful to me. Thanks for sharing!
What a great article. I love your cabinets. The color is to die for. I’m trying to get a fresh cabinet painting soon in my own place, and seeing your design was really helpful to me. Thanks for sharing!
What a great article. I love your cabinets. The color is to die for. I’m trying to get a fresh cabinet painting soon in my own place, and seeing your design was really helpful to me. Thanks for sharing!
What a great article. I love your cabinets. The color is to die for. I’m trying to get a fresh cabinet painting soon in my own place, and seeing your design was really helpful to me. Thanks for sharing!
What a great article. I love your cabinets. The color is to die for. I’m trying to get a fresh cabinet painting soon in my own place, and seeing your design was really helpful to me. Thanks for sharing!
Hello! I love how you mixed the metals in this bathroom and gave it a family yet sophisticated vibe. In fact, we’re getting the same mirror and scones as you because of how nicely it turned out in your bathroom! I would love to know where you got the multi pronged towel hook that you have next to your vanity, it’s so different yet functional. Thanks!
Its Ikea but i dont believe they have this size anymore. just a smaller one.
Amazing! Did you seal the cedar on the ceiling or leave it raw?
we left it raw for the smell aspect when we shower
Amazing! Did you seal the cedar on the ceiling or leave it raw?
we left it raw for the smell aspect when we shower
Amazing! Did you seal the cedar on the ceiling or leave it raw?
we left it raw for the smell aspect when we shower
Amazing! Did you seal the cedar on the ceiling or leave it raw?
we left it raw for the smell aspect when we shower
Amazing! Did you seal the cedar on the ceiling or leave it raw?
we left it raw for the smell aspect when we shower
I love this, we are getting ready to redo our bathroom and this is great inspo! Where did you get your ceiling mounted shower rod from? I can’t seem to find anything like it.
Thanks so much. I hope your Renno goes smooth. As for the shower rod, we actually built it ourselves out of black steel pipes. I have a blog already written on how to so stay tuned over the next two weeks for that to go live.
So beautiful, you did an amazing job. May I ask where is the stripped towel from? the one on your sink
for sure! its from amazon
So beautiful, you did an amazing job. May I ask where is the stripped towel from? the one on your sink
for sure! its from amazon
So beautiful, you did an amazing job. May I ask where is the stripped towel from? the one on your sink
for sure! its from amazon
So beautiful, you did an amazing job. May I ask where is the stripped towel from? the one on your sink
for sure! its from amazon
So beautiful, you did an amazing job. May I ask where is the stripped towel from? the one on your sink
for sure! its from amazon
This is gorgeous! How were you able to plumb the freestanding faucet with the ceiling shower head??
we hired a plumber to rework the entire plumbing of the room when we had the room ripped to the studs.
Also the controls for the showerhead are actually mounted on the wall that the tub is closest to. The freestanding faucet is only for filling the tub up when we are having baths or bathing our children.
I am considering painting a similar hutch that I’ve had for years and placing it in our bathroom. Have you had or do you anticipate any issues with moisture? Did you do anything specifically to prevent that?
we used a chalk paint and sealed it with wax to make it pretty durable to moisture. we did 4 coats of the wax to make sure it was very sealed and so far have had no issues.
Sealing with wax is a great idea. What wax product did you use to seal it? Thank you!
We used Behr wax that made for their chalk paint line
Where did you get the hardware on the vanity? It doesn’t look like the silver stuff that comes on the home depot piece. Thank you! Beautiful job.
we switched them out with some budget friendly ones from Home Depot in a rub oil bronze to match the Faucet.
Where did you get the hardware on the vanity? It doesn’t look like the silver stuff that comes on the home depot piece. Thank you! Beautiful job.
we switched them out with some budget friendly ones from Home Depot in a rub oil bronze to match the Faucet.
Where did you get the hardware on the vanity? It doesn’t look like the silver stuff that comes on the home depot piece. Thank you! Beautiful job.
we switched them out with some budget friendly ones from Home Depot in a rub oil bronze to match the Faucet.
Where did you get the hardware on the vanity? It doesn’t look like the silver stuff that comes on the home depot piece. Thank you! Beautiful job.
we switched them out with some budget friendly ones from Home Depot in a rub oil bronze to match the Faucet.
Where did you get the hardware on the vanity? It doesn’t look like the silver stuff that comes on the home depot piece. Thank you! Beautiful job.
we switched them out with some budget friendly ones from Home Depot in a rub oil bronze to match the Faucet.
GORGEOUS, we are getting ready to do our bathroom this spring, and your bathroom is a great inspiration, can I ask what color you painted the antique hutch. We have a similar hutch in our dining room and I have wanted to paint it for Years!, love the color you chose including the pulls and hinges.
Hey love we have everything documented on a highlight in our Instagram account. The paint colour is classic Noir by Behr In their chalk paint, and then sealed with their black chalk wax. The hardware came from multiple places but we rub’n’buffed it in antique gold
Great looking bathroom! I’m interested to know if/how you would do the shower curtain surround differently? I’m imagining the paint comes off over time, that the hooks don’t glide over the joined parts so well and that the curtain can’t close all the way so you might get water leakage (but some gaps help with the curtain suction effect I bet!) I love the look of it and have struggled with owning 4 units that have clawfoot bathtubs and the surrounds all have some undesirable aspects to them. (some make it a challenge to find short enough curtains for)
I love this so much!! Where did you get your art from?
they are digital downloads from BFF print shop that i printed at staples
I need to know where the rug in the bathroom came from!
its vintage from @velvetandloom
I need to know where the rug in the bathroom came from!
its vintage from @velvetandloom
I need to know where the rug in the bathroom came from!
its vintage from @velvetandloom
I need to know where the rug in the bathroom came from!
its vintage from @velvetandloom
I need to know where the rug in the bathroom came from!
its vintage from @velvetandloom